Archive for the 'pastries' Category

15
Sep
12

Puff Pastry Rugelach w/Ginger Chocolate Fruit Filling (Baked)


At one time I was a paralegal at a large law firm in New York City. I worked every night (7 days a week) past midnight. For dinner, I and my crew would order from Carnegie Deli, and I almost always asked for rugelach for dessert. This version of rugelach simulates a cream cheese pastry dough with standard puff pastry as the base. I could have used the low-temperature puff pastry dough, but this recipe is the first of several LTB experiments with standard puff pastry (Pepperidge Farm brand), purchased at my local market.


In this first trials, I made rugelach like mini crescent rolls. The dough, cut into triangles and spread with a layer of a cream cheese paste and dried fruit and nuts, was rolled up and baked at 250°F/121°C. As seen in the pictures above, the rolls puffed up nicely. However, when cut open, the dough in the inner part of the roll and on the bottom did not puff as much and imparted a hard texture to the pastries.

For the final version, I rolled the puff pastry into a single-layer log, because a single layer bakes faster and more thoroughly. The cream cheese paste was reformulated to be drier, as the wetter paste made the interior soggy. I conclude that for this kind of pastry, the low-temperature puff dough or a cream cheese tart dough would produce a result closer to the traditional rugelach. On the other hand, if these were baked at the package-recommended temperature of 350°F/177°C, these log-style or the crescent rugelach would be very crisp, flaky and spectacular puffs.

Makes 12 rugelach
– 60 calories per rugelach
– Oven Temperature: 250°F/121°C

Pastry:

  • 3 rectangles prepared puff pastry (2 x 4-1/2 x 1/8 inches – see text)
  • 1 egg, beaten

Chocolate Cream Cheese Filling

  • 2 tablespoons cream cheese
  • 2 tablespoons sugar
  • 2 teaspoons cocoa powder
  • 1/4 teaspoon powdered ginger
  • 1 tablespoon whole wheat flour

Fruit-Nut Filling

  • 1/8 cup dried cherries, chopped
  • 1/8 cup raisins, chopped
  • 1 tablespoon chopped nuts

Ginger Sugar

  • 1 teaspoon sugar
  • 1/4 teaspoon powdered ginger

Filling Methods:

1. To make chocolate cream cheese filling: in a small dish, mix the cream cheese and sugar.

2. Add cocoa and ginger and mix until well combined. Set aside.

3. Mix in flour to form a thick paste.

4. To make fruit-nut mix filling, in a small dish, mix the chopped raisins, dried cherries and chopped nuts.

Rugelach Method:

1. For each pastry, cut a sheet of 1/8-inch thick puff pastry dough 2 x 4-1/2 inches.

2. Spread a thin layer of chocolate cream cheese over the surface.

3. Sprinkle about 1-1/2 tablespoons of the fruit-nut mix over the top half of the dough only.

4. Fold the dough up and seal the edges to form a log.

5. Cut the log into 3 pieces and place on baking mat.

6. In a small dish, combine 1 teaspoon sugar and 1/4 teaspoon powdered ginger.

7. Lightly brush the surface of the rugelach with beaten egg or apricot/peach jam and sprinkle with the ginger sugar.

8. Bake rugelach for 50 minutes until golden. They will crisp up as they cool.


13
Jun
12

Banana Fudge And Berry Tart (Dehydrated)

[ Equipment: dehydrator or oven, 9-inch pie pan (7-1/2 inch diameter bottom). For more information about the terminology in this recipe, see Low Temperature Baking: A Journey of 3 Paths ].

This recipe began as an idea for a dehydrated pie. The crust is a variation on dehydrated peanut butter cookies, one of my earliest warm-air-baked cookies on VaporBaker. For a softer crust, increase the amount of peanut butter or a legume butter, as suggested below. Adding more coconut flour would give a crumblier crust. The banana fudge could be served on its own. I’d shape it in a fancy mold and present it with a drizzle of sweet fruit coulis.

I ground my own oat flour from processing traditional rolled oats. The coconut flour is just unsweetened coconut flakes chopped down in a food processor too. I would not substitute the blueberry craisins, as they play off the chocolate background very nicely without commandeering attention. If the local market doesn’t stock blueberry craisins, a mix of chopped dried sweetened cranberries and dried blueberries could work.

At 210 calories per serving, I think of this tart as an affordable dessert, but it could be even lighter with low-sugar ingredients. The maple syrup could be one of those no-sugar syrups. I’ve tried one (Maple Farms) and it works fine. Granulated sucralose or other granulated sweetener could stand in for the sugar. A legume butter in the pie crust dough would cut the calories of the peanut butter. (I don’t recommend a legume butter in step 1 of the assembly, because the peanut butter is meant to be a waterproof coating for the dried crust.) That’s a total reduction of over 400 calories per tart or 50 calories per serving.

This semi-raw tart can be made 100% raw by replacing the maple syrup with a liquid sweetener like honey. Although the tart can be optionally chilled before serving, it is a true dehydrated pastry that doesn’t need refrigeration. The recipe dehydrates at a higher 150°F/65.6°C temperature, to accelerate the preparation, which may impact flavor slightly. However, this tart has flavor to spare.

Makes 8 servings
– 210 calories per serving
– Oven Temperature: 150°F/65.6°C dehydrator

Tart Crust:

  • 1/2 cup oat flour (coarsely ground – see text)
  • 1/4 cup coconut flour (see text)
  • 2 to 3 tablespoons peanut butter or legume butter (see text)
  • 3 tablespoons maple syrup

Banana Fudge:

  • 1 large banana (8 inches)
  • 1 medium zucchini (5 to 6 oz.)
  • 1/4 cup unsweetened natural cocoa powder
  • 3 tablespoons sugar
  • 2 tablespoons maple syrup
  • 1/4 teaspoon powdered cinnamon
  • 1/2 teaspoon vanilla
  • 1/4 cup blueberry craisins

Assembly:

  • 3 tablespoons peanut butter
  • 3 or 4 dried apricots

Tart Crust Method:

1. In a medium bowl, combine the oat flour and coconut flour.

2. Stir in the maple syrup and 2 tablespoons peanut butter to form a moist, pebbly meal.

3. Press the dough into a greased, 9-inch pie pan, covering just the bottom of the pan.

4. Perforate the dough every 1/2 inch.

5. Dehydrate for about 2 to 3 hours until the dough has pulled away from the sides of the pan. If pushed a little, the entire crust should loosen in one piece. Do NOT unmold the crust. Set aside.

Banana Fudge Method:

1. In the small to medium bowl of a food processor, finely chop 1 zucchini.

2. Add the banana and maple syrup. Process until mixture becomes a whipped puree.

3. Add sugar and cocoa powder and process for about 1 minute.

4. Add vanilla and cinnamon, and process until well combined.

5. Pour mixture into a baking dish and spread out. Dehydrate for 3 to 4 hours until about 1/3 original volume. Every hour, stir the mixture to break any skin formed on the surface.

6. Mix in the blueberry craisins.

Assembly Method:

1. Soften 3 tablespoons of peanut butter in the microwave (about 15 to 20 seconds). Spread a thin layer of peanut butter over the top of the tart crust.

2. Cover the top of the crust evenly with the banana fudge. Spread the fudge with the back of a spoon.

3. Slice the dried apricots into thin slivers and sprinkle over the fudge.

4. If desired, cover and chill the tart for about 30 minutes to an hour before serving.

08
Jun
11

Apricot-Almond Cream Puff Pastry Pithivier (Baked)

Standard puff pastry must be baked in a very hot oven, around 400F/204C, to get the bursts of steam that raise and separate the pastry layers. In LTB ovens at 250F/121C, any steam is too little, too late and the layers essentially fuse. This version of puff pastry replaces the steam with a heat-based leavener, namely double-acting baking powder, and replaces the layers of butter with layers of a cake flour-based “oil” dough. The dissimilar doughs resist fusion and separate more easily when the heat-based leavener puffs the layers and lifts them apart. The 2 doughs also imbue the pastry with a crisp yet silky texture.

The idea for the 2 doughs comes from Chinese puff pastry. Chinese puff pastry begins with the inner dough shaped into a ball and then covered with a pie crust-like outer dough. The dough ball is then flattened and rolled up like a jelly roll to create layers and flattened again. The procedure is repeated once more, creating a multilayer effect, although not quite the “thousand layers” of fine puff pastry which would require several more roll outs. In my version, I also dispense with the ball stage. The inner and outer doughs are separately rolled out into rectangles first, stacked and then rolled up like jelly rolls.

Whereas the fat in traditional chinese puff pastry is lard, my doughs contain shortening, because none of my local markets stocks lard. My version of the inner dough incorporates a combination of shortening and butter, cut in as in a pie crust. In my experience, pure oil doughs tend to melt and fuse with surrounding layers when baked for long times at low temperatures. Butter provides structure and flavor, while the oil greases the layers and imparts a silkier mouth feel. Many pastries made with Chinese puff pastry do not rise much but are notable for their crispy layers and luxurious taste. Those characteristics can be achieved with this low temperature pastry too.

As I was developing a low temperature puff pastry, I had in mind one particular baked form: a pithivier. Like Chinese mooncakes, pithiviers are a kind of pie, but unlike mooncakes, they can be as large as a full-size pie. The pithivier in this recipe spans 6 inches, which is about as large as my LTB oven will accommodate. I fill it it with quintessential French flavors: apricots and almonds in the form of an easy almond cream and store-brought apricot preserves.

The classic pithivier filling is a firm-textured almond cream or frangipane made with almond flour. For an alternative, I put in an almond-flavored cheesecake batter, thickened with wheat flour and coconut flour. Without the flour thickeners, the filling would be more liquid-y and would spill over the dough before the top could be applied and sealed. Coconut flour, in particular, is excellent for this purpose, because it soaks up more moisture than the same amount of wheat flour. However, it has a stronger taste that can overpower the almond cream. I added only the amount necessary to achieve an acceptable consistency. For those with the inclination, the cheesecake batter could be replaced with an actual frangipane and the apricot preserves replaced with some kind of homemade apricot compote. The recipe makes over 1 cup of filling, when only about 2 tablespoons are needed per pithivier.

In some steps of the Pithivier Method, I show two pictures of the pastry. The second is an apricot-almond cream pithivier with chocolate chips and possibly demonstrating some variation on the method of assembly.

Makes 1 6-inch pithivier

– 770 calories
– Oven Temperature: 250°F/121°C

Puff Pastry: Outer Dough:

  • 1/4 cup all purpose flour
  • 1 tablespoon sugar
  • 1/2 teaspoon baking powder (double acting type)
  • 1 tablespoon vegetable shortening
  • 3 to 4 teaspoons water

Puff Pastry: Inner Dough:

  • 1/4 cup minus 1 teaspoon all purpose flour
  • 1 teaspoon cornstarch
  • 1/8 teaspoon green tea powder
  • 1/2 teaspoon baking powder (double acting type)
  • 1/2 tablespoon butter
  • 2 to 3 teaspoons vegetable oil

Coconut Almond Cream Filling

  • 8 oz. cream cheese
  • 1/4 cup all purpose flour
  • 1/8 cup coconut flour (see text)
  • 1/2 cup sugar
  • 1 egg (large)
  • 1 teaspoon almond extract
  • apricot preserves

Puff Pastry Method:

1. Outer Dough: in a medium bowl, whisk dry ingredients until well combined.

2. Dice the shortening or break it into small pieces and add to the flour mixture.

3. With hands, rub the shortening and flour until the mixture forms tiny pebbles or use a pastry blender or fork to cut the butter into the flour.

4. Sprinkle in water, 1/2 teaspoon at a time, tossing and pressing  the bits until they are moist and can form a cohesive dough.Shape into a rectangular block. Cover and refrigerate for 20 to 30 minutes.

In my experience, it usually takes just over 3 teaspoons of water to form the dough. Avoid stirring or do it gently so that the gluten bonds don’t network and toughen the dough. Avoid over hydrating the dough. Too much water will turn the pastry dough into bread dough.

5. Inner Dough: in a medium bowl, whisk the dry ingredients until well combined. Dice the butter or break it into small chunks and add to the flour mixture.

6. With hands, rub the shortening and flour until the mixture forms tiny pebbles or use a pastry blender or fork to cut the butter into the flour.

7. Sprinkle in the oil, 1/2 teaspoon at a time, tossing and pressing the bits until they are moist and can form a cohesive dough.Shape into a rectangular block. Cover and refrigerate for 20 to 30 minutes. As before, avoid adding more oil than necessary.

9. Shape into a rectangular brick. Cover and refrigerate for 20 to 30 minutes.

10. Layering: unwrap the outer dough and sandwich it between 2 sheets of plastic wrap at least 11 inches long. Flatten the dough into a rectangle by pressing the knuckles against it. This technique helps to minimize cracking when rolling the dough next.

11. Roll the dough out to a 9 x 5 inch rectangle. Set aside.

12. Repeat steps 10 and 11 for the inner dough.

13. Remove the top plastic from the outer dough and lightly dust with flour. Remove the plastic from one side of the inner dough and stack it on top of the outer dough. Take the top plastic off the inner dough and lightly dust with flour.

14. Beginning at one of the 5-inch sides, tightly roll up the stacked doughs and pinch-seal the flap.

15. Turn the roll around so that the length of the roll is parallel to the length of the plastic sheet with the seam side down. Cover with another plastic sheet.

16. With the rolling pin, flatten the roll by indenting it along the length with the rolling pin. Then roll the dough out to a 9 x 5 inch rectangle.

17. Lightly dust the top of the dough with flour. Beginning at one of the 5-inch sides, tightly roll up the dough and pinch-seal the flap. Then cut the roll in half. One half will be formed into the bottom of the pithivier; the other half will be the top.

Pithivier Method:

1. Pithivier bottom crust: Center one of the puff pastry sections (seam side down) between two sheets of plastic wrap (I re-use the plastic from making the puff pastry). Flatten the roll with a rolling pin and then roll out to approximately a 7 inch circle.

2. Cut out a 6-inch circle. The cutter shown above is actually 5-3/4 inches in diameter.

3. Transfer the pastry circle to a greased baking sheet. In the picture above, the baking sheet is the bottom of a removable bottom cake pan. Spread about 2 tablespoons of the almond cream on the dough, leaving a 1/2 inch border.

Optional: sprinkle 2 or 3 teaspoons of mini chocolate chips over the almond cream.

4. Spread a few teaspoons of apricot preserves over the almond cream. Then brush some beaten egg around the dough border.

5. Pithivier top crust: repeat steps 1 and 2 with the remaining section of puff pastry. After cutting out the 6-inch circle of dough, cut out the venting holes and slits. In the picture above, I used mini cookie cutters for a decorative touch. Before transferring the top crust to the pithivier, I removed the decorative cutouts and set them aside.


6. Position the top crust dough over the apricot-almond cream filling and align the edges. Seal the edges by pressing down and around with a fork or spoon.

7. Brush the top crust with beaten egg. In the picture above, I restored the cutouts that were set aside in step 5 before applying the glaze.

8. Bake for about 60 minutes or until the crust is a golden color. Cool. Slice and serve.


17
Aug
10

Chinese Mooncakes With Plum-Lima Bean Filling (Baked)

[ Equipment: oven or slow cooker. For more information about the terminology in this recipe, see Low Temperature Baking: A Journey of 3 Paths ].

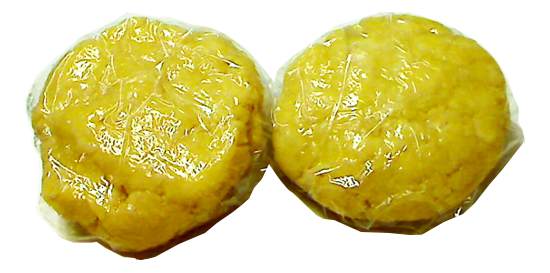
The Chinese Moon Festival happens on September 22 this year, which means: it time for eating mooncakes! This recipe is a healthier take on the classic pastry. It begins with a filling made from dried plums and baby lima beans, replacing the traditional red bean paste which was loaded with fat and sugar. The shell is a low-fat, soft crumb version of the crispy, eggy crust of Shanghai mooncakes from Malaysia. All together, this tasty reconstruction has 1/3 the calories of the mooncakes of yore.

Many people prefer to buy mooncakes than make them under the mistaken belief that they require fancy molds and esoteric ingredients. The popular thin-skinned Cantonese mooncakes sold in the US are molded, but other styles, like the Shanghai mooncakes, are shaped by hand with varying degrees of decoration. Homemade mooncakes can be as elaborate as the baker has time to lavish on them, pleasing the eyes and palette – and the wallet, since a single mooncake can cost over $10 US, and prices are rumored to be higher this year.

This recipe doesn’t jettison the original concept of mooncakes, as some of today’s so-called mooncakes might be accused of doing. In the ingredients and the form are elements of the past. Although the basis of the filling is pureed dried plums, the baby lima beans give structure, cut the intense sweetness and echo the legume nature and shading of traditional red bean paste. (Prepare the beans by soaking them in water ovenight; then simmer until tender, about 40 to 50 minutes.) The 1/2 to 1 teaspoon of sugar is to taste. It acts as a preservative too, since the lima beans dilute the sugar concentration and could weaken the anti-bacterial properties inherent in the dried fruit.

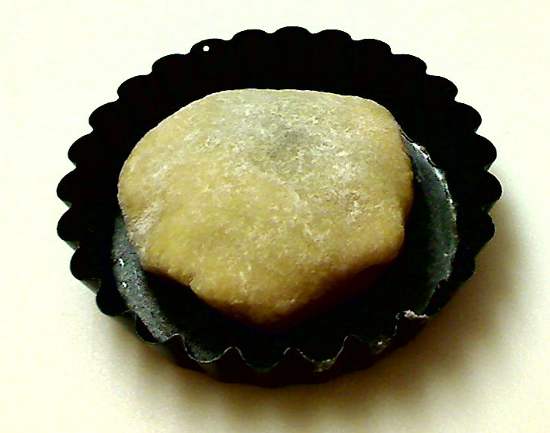
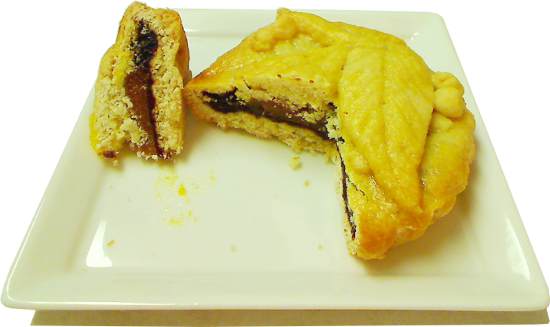
The rich brown of the plum-bean paste contrasts nicely with the yellow-orange of the whole dried apricot, representing the moon (and standing in for the traditional salted egg yolk). Alternatives to dried plums include dried figs or dates. The lima beans could be replaced with another firm, mild flavor bean like mung beans or soy beans or try any bean in the cupboard. Dried nectarines, peaches or kumquats would make fine moons too, if they are small and fit inside the pastry.

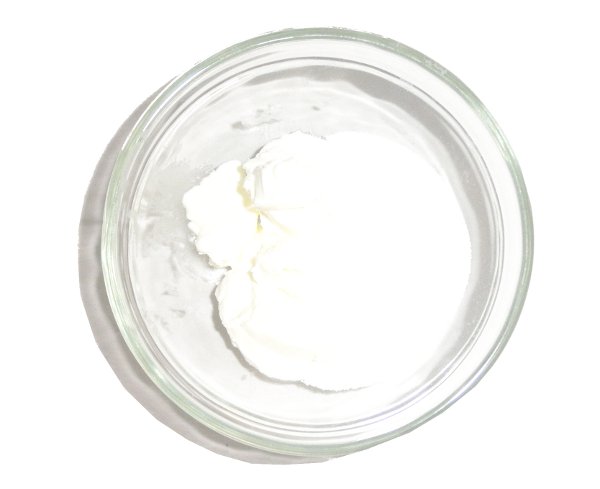
I first read about Shanghai mooncakes at Corner Cafe. They originated in Malaysia, not Shanghai, by way of a similar pastry from Hong Kong. For my recipe, the biscuit crust has been modified in content and technique to reduce the fat and develop a flakier crumb. Yogurt compensates for the excised butter. It imparts richness as well as hydrates the dough. I originally substituted more beaten egg, but decided that the strong eggy flavor competed with the filling. Plain yogurt is fine, but vanilla yogurt brings a touch of smoothness.

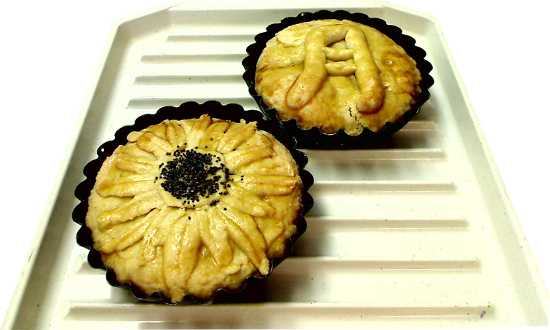
Shanghai mooncakes have a crispy, crunchy shell, while the skin on Cantonese mooncakes is soft and chewy. In both types, the dough is kneaded to develop the gluten. In this recipe, the wet ingredients are incorporated into the dough with very little kneading or stirring to avoid developing the gluten for a tender, flaky pastry, as in a pie crust. In the alternative, for a more traditional, chewier texture, the dough could be kneaded briefly. I pressed the mooncakes into mini tart pans to flatten them into disks and flute the edges, like the scalloped sides on Cantonese mooncakes.

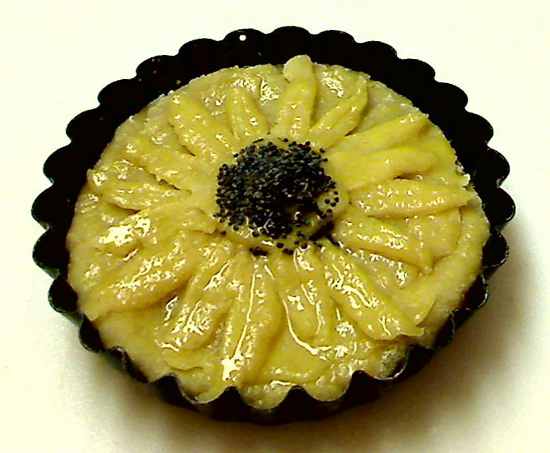
The decoration on top of Shanghai mooncakes can be as simple as almond slivers or pumpkin seeds arranged in an attractive pattern. However, consumers have come to associate the fine and fancy reliefs on Cantonese cakes as a measure of quality. While hand-crafted individual designs are too labor intensive for commercial sales, artisan and home bakers can let their imaginations fly. For the cakes the pictures, I cut out designs from scrap dough, embossed them with the dull back of the knife, laid the pieces out on top and varnished the surface with egg wash to glue them down.  An alternative to cutting out and assembling the designs is to imprint the scrap dough with a small cookie mold or stamp it with a cookie stamp.

Makes 2 mooncakes
– 310 calories per mooncake
– Oven Temperature: 250°F/121°C

Pastry:

  • 1 tablespoon butter or vegetable shortening
  • 1/8 cup sugar
  • 1/4 teaspoon baking powder
  • 1/2 cup flour
  • pinch of salt
  • 1 tablespoon plain or vanilla yogurt (see text)
  • 1 egg beaten (see text)

Filling:

  • 12 dried pitted plums or prunes (about 1/2 cup)
  • 1/8 cup cooked baby lima beans (see text)
  • 1/2 to 1 teaspoon sugar
  • 2 dried apricots (see text)

Filling Method (makes about 3 tablespoons):

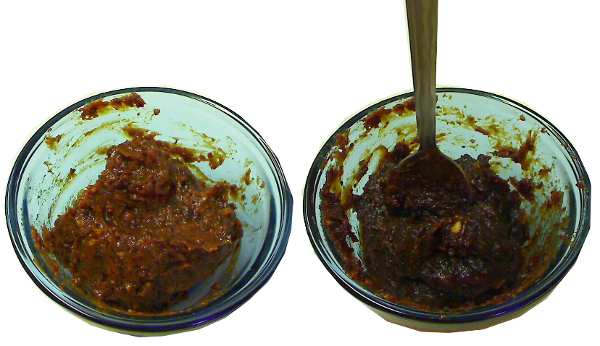
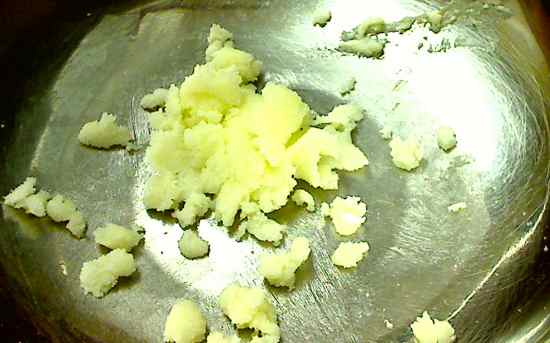
1. Put dried plums, lima beans and sugar in a small bowl and with an immersion blender, puree to a smooth paste. Alternatively, put ingredients in mini food processor and puree to a smooth paste.

2. Transfer paste to a microwave-safe dish and heat on HIGH for 15 to 20 seconds. Remove (careful, dish may be very hot) and stir paste vigorously for about 30 seconds to release steam and cool. Put back in the microwave and repeat heat-stir process another 5 or 6 times, until mixture has darkened and stiffened to the point that an inserted spoon will remain standing.

Alternatively, transfer paste to a small nonstick fry pan and stir over low heat until mixture has darkened and stiffened to the point that an inserted spoon will remain standing.

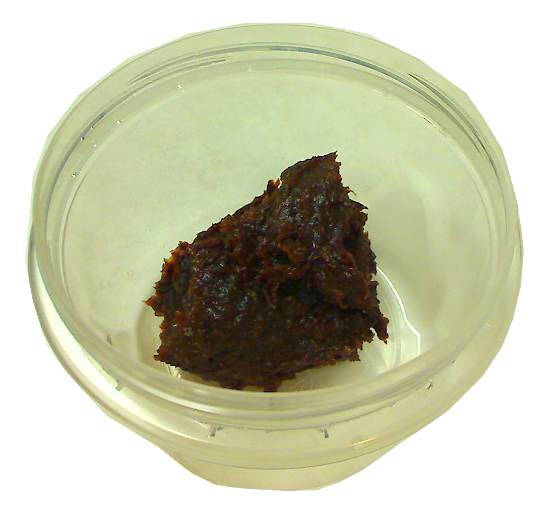
3. Cool and store in a closed container or plastic bag. Refrigerate until ready to assemble mooncakes.

Pastry Method:

Pre-heat oven or cooker to 250°F/121°C.

1. In a bowl, cream butter and sugar with fork until well combined.

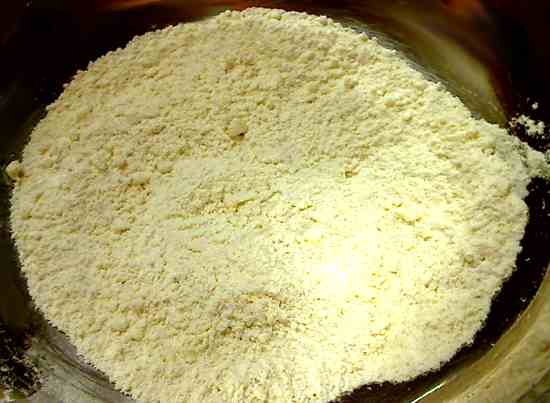
2. In a small bowl, mix flour, baking powder and salt until well combined. Cut flour mixture into butter mixture with a fork or pastry blender until mixture looks uniformly crumbly.

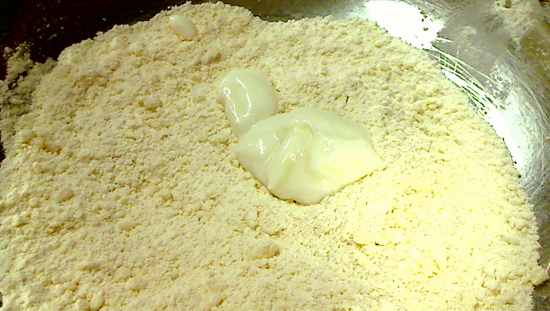
3. Add yogurt and gently toss in flour until yogurt is evenly distributed.

4. Add beaten egg, one teaspoon at a time, using toss, press, crumble actions until mixture just comes together and forms a dough (about 3 to 5 teaspoons). Avoid stirring or kneading the dough or the gluten will toughen the pastry (or lightly knead for a chewier texture – see discussion above).

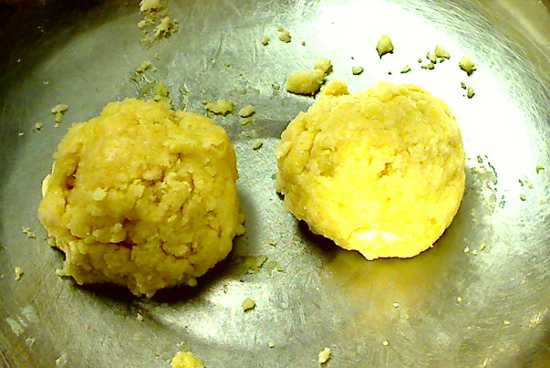
5. Divide dough into 2 portions.

6. Shape each portion into a small disk and cover with plastic wrap (plastic wrap should be larger than 6-inches square). Refrigerate for 30 minutes.

7. Unwrap one disk, lightly dust the dough and plastic with flour, and place disk on center of plastic wrap. Place a another piece of plastic wrap over the dough and roll out a rough circle about 5-1/2 to 6 inches.

8. Remove top plastic wrap, dust with flour and press a 4-1/2 inch round cookie or biscuit cutter into dough. Peel off excess dough and save for decoration. The 4-1/2 inch dough circle could be cut out freehand with a knife too. The cookie cutter method is only a convenience.

9. Optional: place a dried apricot in the center of dough.

10. Put 1-1/2 tablespoons of filling in center of dough, covering the apricot.

11. Lift up sides of dough to wrap the filling and pinch the top closed to form a ball. If the dough is very moist and threatens to tear, slide a butter knife or a frosting spatula under the dough and gently lift up over the filling.

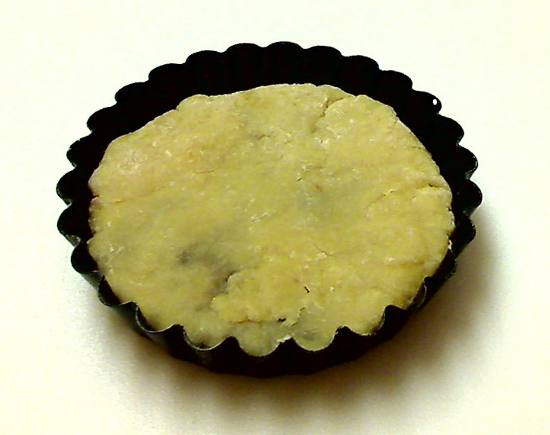
12. Dust the dough ball with flour and gently flatten into a disk, about 3-inches in diameter. Put the disk into a greased mini-tart pan (4-inches diameter), seam side down.

13. Press disk outward until the disk touches the sides of the pan. If there are any thin spots on the surface, cover them with thin sections of scrap dough and rub down edges. The patches don’t have to be blended into the surface, because any telltale seams will be hidden by decoration.

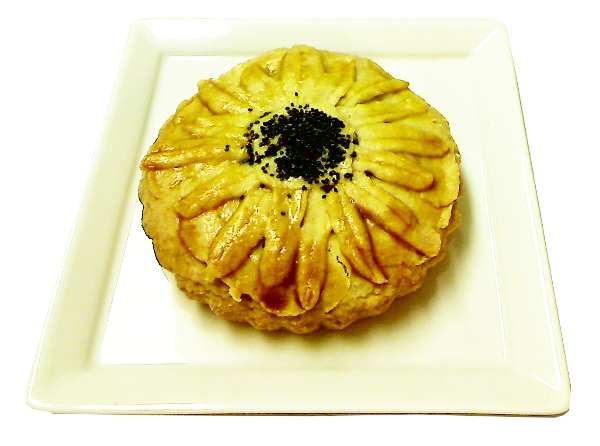
14. With scrap dough, create a decoration on top of the mooncake. Typical mooncake images include flowers, leaves, animals, fishes, abstract patterns and chinese characters. Brush the mooncake with an egg wash made from the leftover beaten egg thinned with 1 or 2 teaspoons of water. In the above picture, the flowerhead on the daisy decoration was covered with poppy seeds for a 3-dimensional effect. The poppy seeds were sprinkled on after the egg wash so they would adhere to the surface.

15. Bake at 250°F/121°C for 60-70 minutes until golden brown. Cool for 30 minutes and unmold. Put the mooncakes on a rack and continue cooling until the bottoms of the mooncakes are dry.

16. The picture above shows the inside of a mooncake with apricot “moon”. I’ve stored these mooncakes at room temperature for over a week. The high sugar, low moisture filling resists spoilage. However, I strongly recommend that they be stored in the refrigerator in an airtight plastic bag or container for maximum freshness.

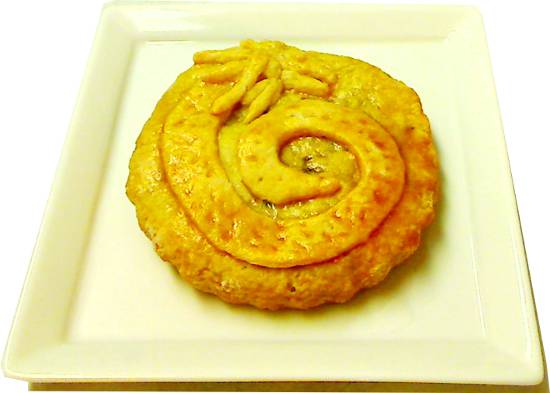
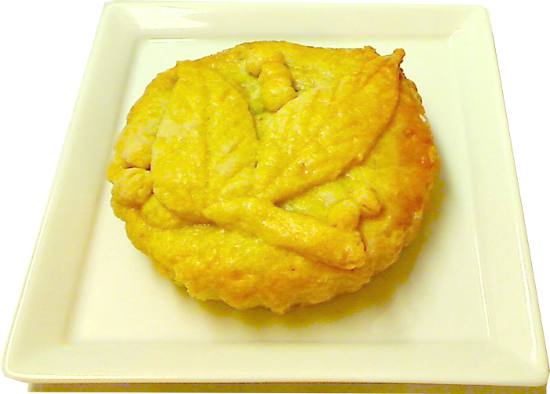
Shown below are some more of my mooncake creations. The designs are (in order) a Chinese dragon, leaves and berries and the Chinese character for “moon”.


Notices

Read about: low temperature baking.