Archive for the 'cakes & trifles & tortes' Category

22
Jul
12

Citrus-Lychee Pavlova with Mango Sauce (Wet-Dry Baked)

[ Equipment: Steam oven or convection oven water tray for wet-dry steam baking, baking sheet with silicone baking mat. For more information about the terminology in this recipe, see Low Temperature Baking: A Journey of 3 Paths ].

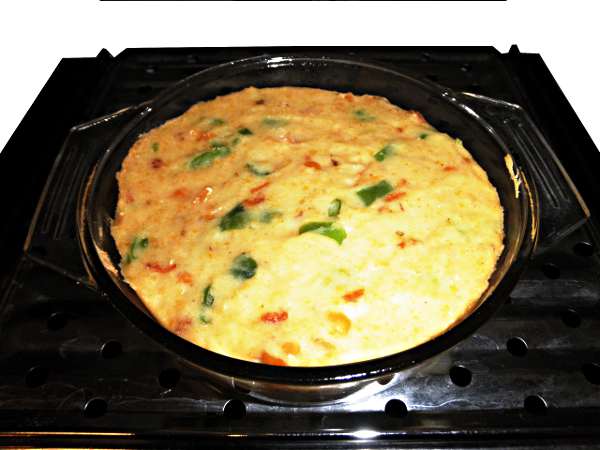
This is my second Pavlova cake. In addition to a different combination of fruits and sauces, it comes with a slightly different recipe for the meringue. The first one (a ginger-blueberry-banana pavlova) was baked in a dry oven. The batter spread out during baking and did not have quite the classic marshmallow texture. The wet-dry steam technique addresses both problems. A wet-dry steam oven steams for a fraction of the baking time only; then it switches to dry heat. The wet phase transfers heat quickly to the food to raise its temperature and set the batter or dough. The dry heat phase crisps the food.

I had reservations about the texture of meringue in the last pavlova. In testing the wet-dry technique, I mixed up a pavlova batter with a higher cornstarch-to-egg-white ratio (identical to other standard recipes), cornstarch being the ingredient that transforms the meringue into a marshmallow-like consistency. The result was excellent on the very first try. The all-sugar batter only spread a little before setting. It had a lovely crackly top crust that began to sink within seconds of being taken out of the oven.

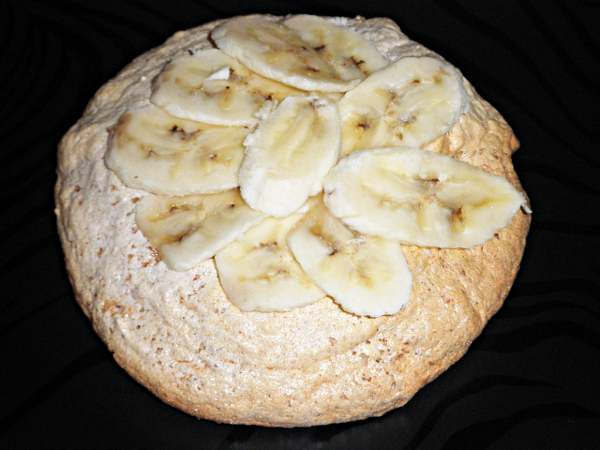
However, the cake shown in these pictures contains the sugar-sucralose blend. For the crispest crust, I recommend making the meringue with sugar only. The sucralose-sugar blend cake has a softer crust and fewer calories, but also more height and does not sink very much. Do not omit the lemon juice; it really perks up the flavor of the lychees, and canned lychees benefit most from the soaking. An assortment of juices could substitute for the mango nectar. A thinner juice may need more cornstarch to thicken.

Makes 6 servings
– 120 calories per serving
– Oven Temperature: Wet-Dry Steam-Baked effective 250°F/121°C

  • 3 large egg whites (room temperature)
  • pinch of salt
  • 1 teaspoon lemon juice
  • 1 teaspoon orange extract
  • 1/2 cup sugar (or 1/4 cup sugar + 8 packets sucralose – see text)
  • 1 tablespoon cornstarch
  • 1 10oz can of mango nectar
  • 2 teaspoons cornstarch
  • 2 tablespoons water
  • 7 or 8 fresh or canned whole lychees, peeled and pitted
  • 1 tablespoon lemon juice
  • 4 oz. of prepared whipped topping
  • 1/4 teaspoon lemon extract

Mango Sauce Method:

1. In a small dish, mix the cornstarch and cold water.

2. In a small saucepot, heat the mango nectar until it simmers, stirring constantly. Whisk in the cornstarch slurry until the sauce thickens. Remove from heat and let cool.

Meringue Cake Method:

1. Drain lychees. In a small bowl, mix lychees and lemon juice. Cover and let macerate in the refrigerator for at least 1 hour.

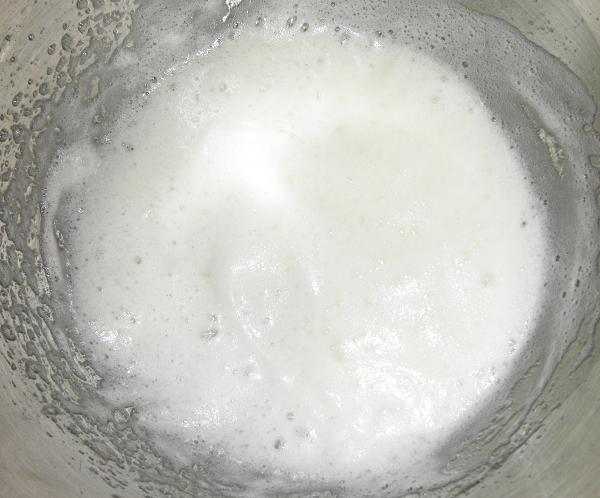
2. In a large bowl, beat the egg whites, lemon juice and salt until frothy.

3. Sprinkle in the sugar in 2 portions and beat to the stiff peak stage. Beat in the orange extract. Sift the cornstarch over the batter and fold in.

4. Spoon batter onto a silicone baking mat sitting on a baking sheet. Shape into a 6 x 4 inch block.

5. Prepare oven for wet-dry steam baking. For a convection oven, fill the water tray with about 1/8 inch water (or the equivalent amount to steam bake for about 30 minutes). Set a trivet in the center to hold the baking sheet above the water line. Preheat the oven to 300F/148C to get an effective 250F/121C steaming temperature (check with a thermometer).

6. Place baking sheet on trivet and bake meringue for 30 minutes.

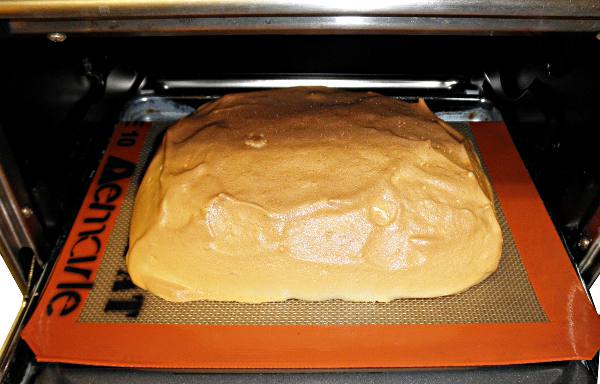
7. Siphon off any remaining water in the water tray (or allow to steam off if nearly evaporated). Turn dial down to 250°F/121°C for dry baking. Continue baking for another 40 to 60 minutes. Surface of crust should be dry and golden brown.

Note: If using the sugar-sucralose blend, the crust may not crisp.


7. Let cool and transfer to a serving plate.

8. In a medium bowl, combine the whipped topping and lemon extract.

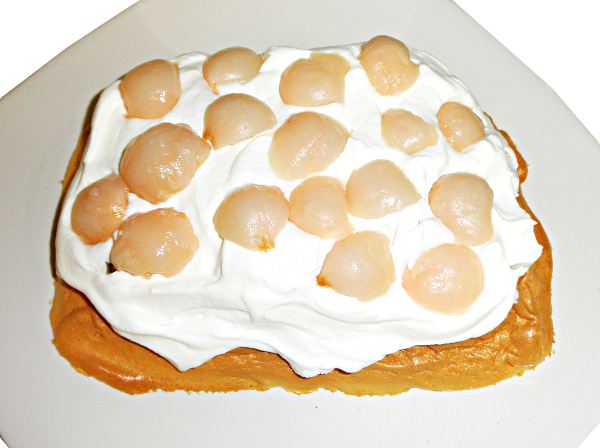
9. Spread the lemon whipped topping over the top of the meringue cake. Drain and cut the lychee fruits in half. Place the lychees into the whipped topping.

10. Drizzle mango sauce over the lychees and whipped topping. Sprinkle top of pavlova with craisins.


10
Jul
12

Cactus Hominy Polenta Cake

[ Equipment: steam oven, steamer or low-temperature-capable convection oven, an 6-inch (2-cup) round cake pan. For more information about the terminology in this recipe, see Low Temperature Baking: A Journey of 3 Paths. ]

This steamed cake is a savory companion to the Maple Polenta Cake with Chamomile Hominy. The batter mixes cornmeal and rice flour for a softer polenta than from cornmeal alone. The tomato bullion contains chicken bullion with dried tomato essence, and regular chicken bullion with a spoon or two of tomato sauce should substitute fine. My local market sold jars of prickly pear cactus nopalitos, cooked and cut into strips. They have a light vinegary flavor and a mucilaginous texture, a great match for the soft polenta. If cactus isn’t available, substitute chopped string beans.

Makes 4 servings
– 105 calories per serving
– Oven Temperature: effective 250°F/121°C steam baked

  • 1-1/2 cups water
  • 1-1/2 tablespoons tomato bullion powder
  • 3 tablespoons plain tomato sauce
  • 1/2 cup cornmeal
  • 2 tablespoons glutinous rice flour
  • 1 cup prepared (canned) hominy
  • 1/3 cup chopped cactus nopalitos (cooked cactus strips)

1. In a small bowl, whisk cornmeal and rice flour until evenly combined.

2. In a saucepan, heat water, bullion and tomato sauce until simmering.

3. Whisk in cornmeal-flour and continue whisking until mixture has thickened and coming away from sides of saucepan.

4. Mix in hominy.

5. Mix in chopped cactus.

6. Pour into greased 6-inch pan or 2-cup baking dish. The polenta cake can be steamed or steam baked. For steam baking, leave the water tray uncovered and place a trivet or stand to hold the dish above the water line. Steam bake at 250°F/121°C for 70 minutes.

7. Cool. Slice and serve.


27
Jun
12

Lemon-Chamomile Angel Food Loaf Cake (Wet-Dry Steam Baked)

[ Equipment: Steam oven or convection oven with water tray for wet-dry steam baking, 8 x 4 x 4 inch loaf pan. For more information about the terminology in this recipe, see Low Temperature Baking: A Journey of 3 Paths ].

This angel food cake has a firmer texture than a standard angel food cake and is shaped in a loaf pan. It’s my first recipe baked with a wet-dry steam method. Steam quickly heats the batter, and then dry heat finishes the cake and crisps the surface. The chamomile and lemon flavoring reminds me of a soothing herbal tea.

I didn’t have a chamomile extract, so I made my own chamomile oil infusion, heating it on top of a ceramic incense burner. There were no instructions for making chamomile oil, so I let it infuse for about a day on low heat, switching out tealight candles (beeswax) as they burned down. I recommend a bland vegetable oil, such as canola oil, to get the best chamomile flavor. Check the temperature of the infusion periodically. It should be no higher than 110-120°F/43-49°C (same as the raw food dehydration guideline) to preserve the flavors and essential compounds in the flowers.

Makes 5 servings
– 162 calories per serving
– Oven Temperature: Wet-Dry Steam-Baked effective 250°F/121°C

Angel Food Cake:

  • 4 egg whites
  • 2 teaspoon lemon extract
  • 1 tablespoon lemon juice
  • 5 tablespoons flour
  • pinch salt
  • 3/4 cup sugar (or low-calorie sweetener blend, see text)
  • 2 teaspoons chamomile oil (see text, see below)

Chamomile Oil:

  • 2 tablespoons vegetable oil
  • 1 tablespoon dried chamomile flowers

Chamomile Extract Method:

1. In a small, heatproof dish, mix oil and chamomile flowers. Heat chamomile mixture over a very low flame for about 24 hours. Shown here is a ceramic oil diffuser as the heat source. Check the temperature of the oil periodically. If it’s above the 110-120°F/43-49°C range, place a disk of aluminum foil between the dish and the heater to dissipate excess heat.

2. Cool. Cover and set aside.

Angel Food Cake Method:

1. Line bottom and long sides of 8 x 4 x 4 inch loaf pan with a single strip aluminum foil to make a sling. Do NOT grease pan.

2. In a medium bowl, whip egg whites, lemon juice, lemon extract, salt until frothy.

3. Sprinkle in sugar and whip to stiff peak stage.

4. Sift flour over batter and fold in.

5. In a small dish, mix 3 tablespoons of the egg white batter and the chamomile oil using a fork. Pour the oil mixture back into the egg white batter and fold in.

6. Spoon batter into lined loaf pan and gently smooth the surface flat.


7. Fill water tray for steaming baking with about 1/8-inch water. The water must completely evaporate after about 30 to 40 minutes of baking. Preheat oven to effective to 300°F/148°C (for an effective temperature of 250°F/121°C with the steam – checked with an oven thermometer).

Place pan on trivet so that it does not touch the water. Bake for about 35 to 40 minutes. Top crust should be lightly golden but sticky. Check water level. All the water in the tray should have evaporated. If not, drain or siphon off the remainder.

Continue baking for another 20 minutes until the crust is crispy and dry and a toothpick inserted in the center comes out clean.

8. Invert the pan over a heatproof bowl and allow the cake to cool.

9. With a small knife, loosen the cake from the short sides of the pan and lift out by pulling out the ends of the foil sling. Carefully peel off the foil.

10. Slice and serve with a drizzle of honey or maple syrup.


22
May
12

Maple Polenta Cake w/Chamomile Hominy (Steam Baked)

[ Equipment: steam oven, steamer or low-temperature-capable convection oven, an 6-inch (2-cup) round cake pan. For more information about the terminology in this recipe, see Low Temperature Baking: A Journey of 3 Paths. ]

The flour in this cake is a blend of cornmeal, coconut and mochi (sweet rice) flours. A polenta batter with only the cornmeal makes a rubbery cake. Starch from the rice flour softens the texture for a pleasant mouth feel. Coconut flour adds flavor, richness and restores a bit of the structure. Like all my cakes without a chemical or organic raising agent, I mixed in a solid leavener – chamomile infused hominy, a fine complement to the cornmeal. This is whole kernel hominy from a can, which has been soaked in an alkaline solution and partially cooked. Some brands have cooked the kernels longer than others. I recommend tasting the hominy before adding it to the batter. If the kernels are too crunchy, try steaming or boiling them for a few minutes, because the baking process may not soften them enough.

Makes 4 servings
– 250 calories per serving
– Oven Temperature: effective 250°F/121°C steam baked

  • 1 tablespoon chamomile flowers or 1 chamomile teabag
  • 1-1/4 cup boiling water
  • 1 cup canned hominy kernals (see text)
  • 1/2 cup cornmeal
  • 1 tablespoon mochi (glutinous rice) flour
  • 1-1/2 cup milk (low fat or fat free)
  • 3/8 cup maple syrup
  • 1/8 cup sugar
  • pinch of salt
  • 1/4 teaspoon cinnamon
  • 3 tablespoons coconut flour
  • 1/4 cup raisins

1. Brew chamomile tea by seeping chamomile flowers in hot water for 30 minutes. Filter tea. Reserve 1/4 cup of chamomile tea for later.

2. Rinse 1 cup hominy. Reheat remaining cup of chamomile tea. Soak hominy in chamomile tea for 1 to 2 hours. Drain, reserving hominy and 1/4 cup chamomile tea.

3. In a saucepan, stirring constantly, heat milk, 1/4 cup chamomile tea, syrup, water, sugar, cinnamon and salt to simmering.

4. In a small bowl, combine cornmeal and mochi flour. Whisk cornmeal into milk. Continue whisking over medium heat until thickened and batter begins pulling away from side of the pan, about 2 to 3 minutes. Remove from heat.

5. Mix in vanilla. Mix in hominy.


6. Mix in coconut and raisins.

7. Scoop dough into a greased, 2-cup baking dish.

8. If necessary, prepare the oven for steam baking. Steam bake for 50 mins.

9. Cool until warm for serving.


10. Slice and serve with a drizzle of maple syrup.

22
Apr
12

Daikon-Chana Mochi Rice Cake (Steam Baked)

Daikon radish cakes are staples in Chinese restaurants, from pan-steamed batters of rice flour and daikon radish puree. This version substitutes glutinous rice flour (mochi flour) for white rice flour. Because mochi flour cooks up sticky and gooey, a regular daikon mochi cake does not slice well. Slices of my first daikon cakes, even when refrigerated, melted on the plate. This cake gets its firm structure from two egg whites mixed into the batter.

Chana are chickpeas. I puree them into the batter and add whole chickpeas as a sort of solid leavener. I get my prepared chickpeas from a can: whole, solid, soft without any grittiness. Home-cooked chickpeas should be similarly soft, but without dissolving into mush. They add variations in texture. Pinto-bean daikon cakes work well (daikon-uzura cake), and they’re a big hit too.

Traditional daikon rice cakes are steamed; this one is steam baked and has a light crust. If desired, it could be made in a standard water steamer.

Makes 4 servings
– 250 calories per serving
– Oven Temperature: effective 250°F/121°C steam baked

  • 2 tablespoons dried shrimp
  • 3/4 cup boiling water
  • 6 oz daikon radish, sliced into chunks
  • 1 cup cooked chickpeas (drained)
  • 2 egg whites
  • 1/4 cup shrimp soaking liquid
  • 1/2 teaspoon salt
  • 1/8 teaspoon chili powder
  • 3/4 cup glutinous rice flour
  • 1/2 green beans, steamed, rough chopped

1. soak shrimp in hot water for about an hour. Drain, reserving 1/2 cup of liquid. Chop shrimp.

2. Cut daikon into small chunks. Steam for about 10 minutes.

3. In a small bowl of a food processor, puree 1/2 cup chickpeas and the steamed daikon.

4. Add egg whites, 1/4 cup shrimp soaking liquid, salt and pepper or chili powder and blend until smooth, about 1 minute on high speed.

5. In a large bowl, mix the rice flour and daikon puree. Stir to form a thick batter.

6. Add chopped green beans and chopped shrimp and stir until combined.

7. Mix in 1/2 cup chickpeas.

8. Pour batter into a greased, 6-inch (2-cup) baking dish. If necessary, prepare oven for steam baking. Bake at effective 250°F/121°C for about 40 minutes. Cake should be translucent and firm. The top of the cake should have a light crust.

9. Cool and serve.


01
Mar
12

Triple Floral Red Earth Cake (Baked, Low Fat/Sugar)


[ Equipment: convection oven (preferred) or other LTB oven, a 8-1/2 x 4-1/2 x 2-1/2 (inch) loaf pan. For more information about the terminology in this recipe, see Low Temperature Baking: A Journey of 3 Paths ].

Compared to the mini red earth cake I made back in 2010 as a tribute to the American South of Gone With The Wind, the “triple” in the title of this cake refers to its size (3 times the size of the mini) as well as the 3 kinds of flowers that color and flavor it. In the original, a hibiscus infusion tinted the deep brown cake with a rusty tinge spotted with flecks of red hibiscus petals. The texture of that cake could sometimes taste dry, so I reformulated it recently with greater moisture retention in mind. A small amount of oat flour (coarsely-ground rolled oats) absorbs water more efficiently than wheat flour. The cornstarch has been replaced with more baking powder – which has a cornstarch base and helps soften the crumb. For this reason, the baking powder MUST have a cornstarch base (check the label – it should be the first ingredient). I’ve tried as much as 3 tablespoons of baking powder, because the hibiscus seems to reduce the lift, but 3 was too much. The cake has more fat (in the form of oil), but still earns the title of low fat at around 5 grams per serving.

A tri-part bouquet infusion subtly flavors the updated cake with hibiscus, roses and lavender. The color is lighter and redder, due to the slightly higher concentration of red and purple flowers and acidified natural cocoa powder. A traditional red earth (like a traditional red velvet cake) rouges from red food dye and the acidification of natural cocoa powder. My mini cake from 2010 contains dutch-processed cocoa (Hershey’s Special Dark Cocoa) that never reddens. In this cake, the tartness of the floral blend is the main acid in the batter, and I mix in some lemon juice to fix the color of the cake and restore brightness to the flavor.

Since I put in more oil, I take out calories by replacing the sugar with a sucralose-sugar blend. I grind the flower petals and buds with real granulated sugar, but sweeten the rest of the cake with granulated no-calorie sucralose. Although granulated sucralose weighs less than sugar, I did run a test with it as a grinding medium for the flowers, and it works fine. In general, I prefer the taste of sucralose-sugar blend, but this cake could be made with 100% granulated sucralose or 100% sugar, for that matter.

In one of the pictures, I garnish the cake with a “sugared” nut. The coating is actually granulated sucralose, which bakes into a whitish shell. The nuts are quite tasty, so I include the recipe for them below. By the way, I should emphasize that this cake was made with granulated sucralose throughout, not powdered sucralose – the kind in the packets. Powdered sucralose could work too, but with a slight change in the texture of the cake and in the appearance of the nuts.

Makes 8 servings
– 165 calories per serving
– Oven Temperature: 250°F/121°C

Cake:

  • 1-1/2 cup all-purpose flour
  • 1/4 cup oat flour (see text)
  • 1/4 teaspoon salt
  • 1-1/2 tablespoons double-acting baking powder
  • 1/4 cup boiling water
  • 2 teaspoons lemon juice
  • 1/2 teaspoon powdered coffee bean or instant coffee crystals (see text)
  • 1.2 oz. dried hibiscus flowers (approx. 4 tablespoons powdered hibiscus, see text)
  • 2 tablespoon dried rose petals
  • 1 teaspoon dried lavender flowers
  • 1 tablespoons natural cocoa powder (see text)
  • 1/4 cup sugar
  • 3 tablespoons vegetable oil
  • 1/2 cup applesauce
  • 2 large eggs
  • 1/2 teaspoon vanilla extract
  • 3/4 cup granulated sucralose
  • 1 tablespoon evaporated milk, skim or reduced-fat
  • Fat-free Cool Whip topping or whipped evaporated skim milk (sweetened)

Sugared Nuts:

  • Assorted large nuts (almonds, pecans, cashews, Brazil nuts)
  • 2 to 3 tablespoons granulated sucralose or sugar
  • 1 egg white


Sugared Nuts Method:

1. Cover cookie sheet with silicone baking mat or parchment paper. Rinse off nuts of any oil and salt and dry.

2. In a small dish, light beat the egg white. Dunk nuts in egg white and allow excess to drip off.

3. Roll nuts in sucralose or sugar until evenly coated.

4. Place nuts on baking sheet.

5. Bake at 250°F/121°C for about 25 minutes or until sugar coating is dry and has turned lightly golden.

Cake Method:

1. In a medium bowl, whisk all-purpose flour, oat flour, baking powder and salt until well combined. Set aside.

2. In a small food processor, add 1/4 cup sugar, hibiscus, rose petals and lavender buds. Process until contents have turned to powder.


3. In a medium bowl, mix boiling water and floral powder. Let infuse for at least 5 minutes and until water has cooled. Add coffee crystals/powder, cocoa powder and lemon juice. Stir and let sit for 2 to 3 minutes.

5. In a large bowl, whisk the eggs, vegetable oil, applesauce, vanilla extract and evaporated milk until well combined.

6. Mix in 3/4 cup granulated sucralose. Mix in hibiscus infusion.


8. Mix in flour mixture in 3 or 4 portions.


9. Pour into 8 x 4 inch loaf pan. Cover top of loaf pan with aluminum foil, crimping down edges. With a scissors or the pointed end of a bamboo skewer, cut out a rectangle in the foil, leaving a 1-inch border. With scissors, at each corner of the rectangle, snip a 1/2-inch diagonal cut.

10. Bake at 250°F/121°C for about 20 to 25 minutes or until cake almost touches foil. With 2 spoons or forks, peel back foil flaps on all 4 sides. Continue baking for another 15 to 20 minutes (total baking time: 35 to 45 minutes). Cake is done if a skewer inserted in the center comes out clean.

11. Let cool. Unmold.


12. Slice and serve. Below are two ideas for serving the cake: whipped cream topped with a sugared nut or whipped cream, a sprinkle of cocoa powder and topped with a sliced strawberry.


21
Feb
12

Mint Lavender Brownies (Dehydrated, Low Sugar/Fat)

[ Equipment: food dehyrator or low-temperature-capable convection oven, an 8-inch square cake pan. For more information about the terminology in this recipe, see Low Temperature Baking: A Journey of 3 Paths ].

These semi-raw, moist, chewy brownies scented of mint and lavender have been packed with grains, fresh and dried fruits and nuts, but weigh in at less than 1/2 the calories and 1/5 the fat of commercial raw brownies made from date and nut pastes. The solid leavener (puffed rice squares cereal) transforms the oat flour dough into a pseudo-cake with a soft, coarse crumb. It’s also the only non-raw ingredient and could be omitted to make 100% raw brownies.

It was my first dehydrated cake. In raw cuisine, a cake is constructed from layers of date and nut pastes, often chilled or frozen for firm slicing. I wanted a cake with a lighter texture, however. Plus, a cake on VaporBaker should be baked; chilled cakes didn’t truly qualify. The raw cookie doughs from my earlier dehydration recipes would be too firm or crumbly to fashion into cakes. They had binders of a nut or legume butter sweetened with honey or a syrup, binders that broke apart too easily for a chewy-type brownie.

For this recipe, I coarsely ground oatmeal in a food processor to make oat flour in a ratio of 1-1/4 cup oatmeal per 1 cup of oat flour. A maple syrup, raisin and banana puree formed a very flexible binder, because the hydrophilic fruits dehydrated slowly into a sticky adhesive. A large banana alone pureed with the syrup could probably have held the cake together as well, but the raisins helped darken the binder to blend well with the cocoa.

The brownies can be made without a leavener, but puffed rice squares substantiated the texture by adding volume without impacting the taste. Regular puffed rice cereal (individually puffed grains of rice) might not work as well as the squares, which trap more air in the dough. Do not substitute a puffed grain containing gluten (such as puffed wheat or puffed kamut). The gluten stretches too much when moist for a rubbery mouth feel.

I’ve been experimenting with low-fat, low sugar ingredients, but only recently extended that paradigm to dehydrated pastries. Alternative no-calorie sweeteners like sucralose didn’t behave like sugar other than as a sweetener. For example, the sugar-free maple syrup from Maple Grove Farms (the only brand in my local market) lacked the body and tack of regular syrup, so I left it to the banana-raisin puree to supply both flavor and adhesion for the dough. For those who avoid sucralose and all the other alternative sweeteners, I have also given sugar-based options.

The perforations in the dough helped speed the evaporation of moisture. The brownies are heated at a relatively high temperature of 150°F/65.5°C for the first hour to warm up the dough quickly and reduce the overall dehydration time (less than 3 hours total). Those with more time could dehydrate at 125°F/51.7°C throughout.

Although these brownies must refrigerated because they contain fresh fruit and will spoil at room temperature, they will harden when chilled. A few minutes in the dehydrator brings them back to life.

Makes 12 servings
– 100 calories/3g fat per serving
– Oven Temperature: 125-150°F/51.7-65.5°C

  • 2 cups coarsely-ground oat flour (see text)
  • 1/2 tablespoon lavender flowers
  • 1 teaspoon crushed mint leaves
  • 1/2 cup natural cocoa powder
  • 2/3 cup sucralose-sweetened maple syrup or dark agave syrup (see text)
  • 4 packets powdered sucralose or 1/8 cup sugar
  • 1 medium banana
  • 1/2 cup raisins
  • 1 teaspoon vanilla extract
  • 1/4 teaspoon salt
  • 1/2 teaspoon finely ground coffee bean or instant coffee
  • 1 cup puffed rice squares cereal (Rice Chex)
  • 1/4 cup raw sunflower seeds (optional)

232 cal/15 g fat

1. Cover raisins, lavender flowers and mint leaves in hot water and soak about 1 hour or until plump. Drain, reserving raisins, lavender flowers and mint. Set aside.

2. In a large bowl, mix oat flour (w/lavender), salt, cocoa powder until well combined.

3. In a blending cup, puree maple syrup, raisin mixture, vanilla extract, salt, coffee powder and sucralose with an immersion blender until smooth (or do this in a blender).

4. Add banana, cut into small chunks, and blend until smooth. Total volume should be around 1-1/2 cups.

5. Pour wet ingredients into flour mixture and stir until moistened.

6. Stir in sunflower seeds.


7. Add puffed rice squares cereal and stir gently until evenly distributed. Try to avoid crushing the cereal.

8. Grease 8-inch square pan. Press dough into the pan. With 1/8 inch skewer, perforate the dough through to the bottom of the pan at 1/2-inch intervals.

9. Dehydrate at 150°F/65.5°C for 1 hour. Reduce heat to 125°F/51.7°C and dehydrate for another 1-1/2 to 2 hours. Brownies should be firm, moist but not soggy. Score into 12 squares.

Store brownies in an air-tight container in the refrigerator. Warm them before serving.

17
Feb
12

Ginger Meringue Cake (Pavlova) w/Bananas, Ginger-Blueberry Sauce (Baked, Low Sugar-Fat)

[ Equipment: convection oven (preferred) or other LTB oven, baking sheet. For more information about the terminology in this recipe, see Low Temperature Baking: A Journey of 3 Paths ].

July 22, 2012: I now recommend that this cake be made with a wet-dry steam baking method to set the cake faster and 1 tablespoon of cornstarch in the batter for improved texture. Fill the water tray for 30 minutes of steam. See here for details. For a crispy crust, use 100% sugar. For a taller cake (and lower calories), use the sugar-sucralose blend.

Between the 2 kinds of meringue cakes, Pavlova and angel food, the Pavlova had the advantage of being easier to prepare, or so I thought. Over the months, I baked many, varying the amounts of cornstarch, lemon juice, flavorings, all-sugar vs. sucralose-sugar blends, preparation procedures. The crust on a typical Pavlova sinks and cracks as it cools. The version presented here has a thinner crust that cracks only a little and doesn’t sink much at all.

The picture above shows a maple Pavlova meringue with substantial cracking and sinking. The main differences between it and this recipe are the amount of cornstarch – only half as much in the Ginger cake and the reduced baking time – 30 minutes less for the ginger cake. Less cornstarch didn’t appreciably alter the taste of the meringue (it still had the starchy characteristic of a Pavlova), but it did help the meringue hold its shape longer in the cooler oven. More cornstarch seemed to create a slicker batter.

Another reason for the spreading appeared to be the fact that I mixed in granulated white sugar instead of the caster sugar specified in almost all recipes. Granulated sugar didn’t dissolve quickly, and the left-over grains may have caused the structure of whipped egg whites to collapse under heat. My solution was to add the sugar while the whites were still liquid, before they began drying out from the suspension of air bubbles from the whipping. The maple meringue also contained 100% sugar, which may have contributed to the fragile crispness that dammed batter as it formed.

Having said all that, the batter spread made larger disks of meringue, which could then serve more people. One time, it came out in a 10=inch round that was about 3/8-inch thick (see picture above). It easily could serve 8 by piling more fruit and whipped cream over it. The batter in this recipe resists spreading. The ginger cake started out as a 5-1/2 round and came out measuring 7 inches in diameter. For a larger cake, make a larger round with the meringue before baking.

The Pavlova is fat-free, gluten-free and low sugar. In place of the fat-free Cool Whip topping, I would beat evaporated skimmed milk until thick and then sweeten it with sucralose to taste. Those who don’t like no=calorie sweeteners could increase the amount of granulated white sugar to 1/2 cup.

Makes 4 servings (up to 8 servings – see text)
– 130 calories per serving (4 servings)
– Oven Temperature: 250°F/121°C

Meringue Cake:

  • 3 large egg whites (room temperature)
  • pinch of salt
  • 1 teaspoon lemon juice
  • 1/2 teaspoon vanilla extract
  • 1/4 cup sugar + 8 packets sucralose or 1/2 cup sugar (see text)
  • 1/2 tablespoon cornstarch
  • 2 teaspoons powdered ginger
  • 1/4 teaspoon chili powder

Ginger Blueberry Sauce and Cake Topping:

  • 1 cup blueberries
  • 1 packet sucralose (see text)
  • 1/8 teaspoon powdered ginger
  • 1/4 teaspoon cornstarch
  • 1 teaspoon water
  • 1/2 banana, sliced
  • 1 cup no-fat sweetened whipped cream or no-fat Cool Whip topping

Ginger Blueberry Sauce Method:

1. In a heatproof dish, lightly mash 1/2 cup of fresh blueberries.

2. Add powdered ginger, sucralose and mix.

3. In a small dish, mix the cornstarch and water. Add to the blueberries and stir.

4. Microwave on HIGH for about 1-1/2 minutes until thickened.

5. Cool for a few minutes. Mix in 1/2 cup of fresh blueberries. Set aside.

Pavlova Method:

1. In a large bowl, beat the egg whites, lemon juice and salt until foamy.


2. Beat in sugar or sugar-sucralose blend in 3 or 4 portions and beat to the soft peak stage. Then add vanilla extract and beat to the stiff peak stage. Egg whites should still be glossy but not wet.

Note: granulated white sugar will not dissolve completely in stiffly beaten egg whites. Add the sugar at the foamy stage only or substitute a finely ground sugar.


3. In a small bowl, mix the cornstarch, ginger, chili powder until well combined. Fold mixture into the egg whites.


4. Set a silicone baking mat on a baking sheet or cover a baking sheet with parchment paper. Gently spoon the egg white batter onto the baking sheet and shape into 5-1/2 inch round. The top should be slightly concave.

The pavlova will spread a little as it bakes. In my oven, a 5-1/2 inch disk of meringue evens out to about 7-inches.

5. Bake at 250°F/121°C for 30 minutes. If the base of the meringue cake is a golden brown and will burn, reduce heat to 200°F/93°C and continue baking for another 30 – 45 minutes, until the surface of the cake is dry and the sides are lightly golden. Turn off the oven and allow the cake to cool completely in the oven.

If the cooled cake feels soggy on the surface, dry it out in a 200°F/93°C for 10 to 15 minutes.

6. Transfer the pavlova to a serving plate.

7. Cover the top of the cake with a layer of sliced bananas.

8. Spread on a layer of no-fat whipped cream or whipped topping.

9. Pour the ginger-blueberry sauce and blueberries over the whipped cream. Slice and serve.

26
Jan
12

Apple Celery Cake w/Roasted Carrots (Baked)

[ Equipment: convection oven (preferred) or other LTB oven, a 8-1/2 x 4-1/2 (inch) loaf pan. For more information about the terminology in this recipe, see Low Temperature Baking: A Journey of 3 Paths ].

A Waldorf salad inspired this cake of apple, celery and carrots. The truth is: I’ve never had a Waldorf salad, but the first time I saw it on a menu, I thought the flavors would make an intriguing cake. Because carrot cakes are fairly common, apples and celery make up the main character of this creation, accented with chopped up roasted carrots. There’s an almost ethereal quality to this delicately flavored and smooth textured cake, so lightly sweet that it almost drives a craving to eat the entire cake at one sitting. I like to serve it with dots of tiny seeds (shown with sunflower seeds) on a streak of whipped cream for a crunchy contrast.

The base recipe was a pound cake from The Complete Cooking Light Cookbook, but modified. I took out their prune puree for my own applesauce and celery mash, cut back the sugar a bit and reduced over hydration. The low-temperature technique for roasting the carrots essentially steams them first and then roasts them to caramelize lightly and concentrate the sugars. For more intense flavor, increase the oven temperature to 300°F/149°C at the risk of higher acrylamide formation. I baked the cake in a convection oven. It should do well in a slow-cooker oven too, but will be less likely to brown on the top and may require another 10 minutes or so more baking time.

Makes one 8-1/2 x 4-1/2 inch loaf, 10 servings
– 1800 calories per loaf, 180 calories per serving
– Oven Temperature: 250°F/121°C

Cake:

  • 2 to 3 stalks of celery ( to make 1/4 cup finely chopped celery)
  • 1/2 cup sweetened applesauce
  • 1/4 cup butter or vegetable oil spread (see text)
  • 1/2 cup sugar
  • 2 large egg whites
  • 1 large egg
  • 1-3/4 cup all-purpose flour
  • 2-1/2 teaspoons double-acting baking powder
  • 1/4 teaspoon salt
  • 1/2 teaspoon ground cinnamon
  • 3 tablespoons milk
  • 1/3 cup chopped roasted carrots (see below, see text)

Roasted Carrots:

  • 3 carrots
  • 1 to 2 teaspoons vegetable oil

Topping:

  • sweetened whipped cream or Cool Whip whipped topping
  • sunflower seeds for sprinkling
  • powdered cinnamon


Roasted Carrots Method:

1. Slice carrots about 1/4 inch thick.

2. Line baking tray with aluminum foil. Put carrots on foil and toss with vegetable oil.

3. Crimp foil into a pouch.

4. Bake at 250°F/121°C for 1 hour.

5. Open pouch and flatten foil. Spread carrots to a single layer. Continue baking for another 30 minutes.

6. Chop carrots into 1/4 to 1/2 inch bits.

Cake Method:

1. Finely chop celery in a food processor with a blunt blade (the same blade used for chopping nuts). Processing with a blunt blade bruises the celery and expresses celery juice. Do NOT puree.

2. In a medium bowl, whisk the flour, salt, baking powder and cinnamon until well combined.

3. In a large bowl, mix the applesauce, chopped celery, butter and sugar until well combined and the butter has been broken down into tiny flecks – about 4 to 5 minutes with an electric mixer on low setting 1 or 2.

4. Add milk, whole egg and egg whites. Continue mixing for another 1 to 2 minutes.

5. Mix in flour in 3 or 4 portions to form a thick batter.

6. In a small bowl, coat chopped roasted carrots in 1 to 2 teaspoons of all-purpose flour. Fold carrots into batter.

7. Pour batter into a 8-1/2 x 4-1/2 x 2-1/2 inch loaf pan. Smooth surface of batter with a spoon or spatula.

8. Cover top of loaf pan with aluminum foil, crimping down edges. With a knife or the pointed end of a bamboo skewer, cut out a rectangle in the foil, leaving a 1-inch border. With scissors, at each corner of the rectangle, snip a 1/2-inch diagonal cut.

9. Bake until cake has risen to almost touch the foil (about 30 minutes). With 2 spoons or forks, lift the foil flaps up and away from the cake. Continue baking for another 40 minutes or until the internal temperature of the cake is around 200°F/93°C.

10. Remove foil. Cool for about 30 minutes.

11. Un-mold and continue cooling on rack.

12. Slice and serve.

13. This slice was topped with a whipped topping (Cool Whip or a sweetened whipped cream), a dash of cinnamon and a sprinkling of sunflower seeds.

10
Jan
12

Miele Lemon Pudding Cake (Steam Baked)


[ Equipment: steam oven / convection oven (for steam baking) / boiling water steamer, a 6-1/7 (inch) baking dish or cake pan. For more information about the terminology in this recipe, see Low Temperature Baking: A Journey of 3 Paths ].

This lovely melt-in-mouth cake has a top layer of lemon-y custard goodness with lip puckering lemon flavor thanks to a heavy dose of lemon juice and lemon extract. It’s poured into the pan as a single batter and separates into 2 layers as it bakes with the pudding layer on the bottom. Miele prepared the original recipe for their own line of steam ovens. That recipe made 16 mini cakes. I adapted it for a single 2-serving “large” cake for steam baking in a convection oven.

The only changes I made to Miele’s ingredients roster was substituting lemon extract for lemon zest and some pinches of salt to bring out the cake’s sweetness and a dash of lemon juice in the egg white to stabilize it for whipping. I also changed the mixing procedure. To get that potent, bright lemon flavor, the lemon juice went into the batter after the milk had been combined with the fat. I tried one cake where the lemon juice reacted with the milk in a small bowl first (to make a sour milk), and it wrecked the lemon flavor.

The amount of flour appeared to determine the size of the pudding layer. The less flour in the batter, the more custard formed. Up to 2 tablespoons of flour in the batter still left a thin, sticky coating of pudding.

The maximum temperature of Miele’s standard steam ovens is 212°F/100°C, so the cake could have been baked in a stove-top steamer too. I steam baked it in a high humidity convection oven at 250°F/121°C. I also made one in low humidity oven. The two versions came out slightly different, with the most notable difference being that the pudding layer on the low humidity version was more liquid and the cake a little denser. Once the whipped cream and strawberries go on, the differences disappear.

Makes one 6-1/2 inch cake, 2 servings
– 275 calories per serving
– Oven Temperature: 250°F/121°C (steam baking) or 212°F/100°C (steaming)

  • 1 large egg, separated
  • 2 tablespoons + 1/4 teaspoon lemon juice
  • 1/2 + 1/4 teaspoon lemon extract
  • 1/4 cup sugar
  • 1/16 + 1/16 teaspoon salt
  • 1 tablespoon butter or vegetable oil spread
  • 1/4 cup milk
  • 4 teaspoons all-purpose flour
  • 4 strawberries, sliced in half
  • 1/2 cup Cool Whip or sweetened whipped cream

1. In a medium bowl, beat the egg white, 1/4 teaspoon lemon juice, 1/4 teaspoon lemon extract, 1/16 teaspoon salt until frothy.

2. Sprinkle in 2 tablespoons of sugar in 2 portions, beating until glossy with stiff peaks. Set aside.

3. In another bowl, cream softened butter or vegetable spread with 2 tablespoons sugar.

4. Mix in the egg yolk and 1/16 teaspoon salt.

5. Whisk in 1/2 teaspoon lemon extract and milk.

6. Whisk in 2 tablespoons lemon juice. Do NOT add the lemon juice at the same time as the milk in step 5, because it will affect the lemon flavor.

7. Whisk in the flour.

8. Stir in in 2 tablespoons of the beaten egg white to give the egg mixture a tiny bit of volume.

9. Fold in the remaining beaten egg white. Pour batter into a 6-1/2 baking dish or pan.

10.

Steam Oven or Boiling Water Steamer: Pre-heat oven according to instructions or bring water in steamer to a boil.

Convection Oven Steam Baking (details here): Fill 1/2 of water tray with boiling water. Do NOT cover the water tray. Preheat oven to reach an internal temperature of 250°F/121°C.

11. Place pan on trivet.

12. If steam baking, bake for 30 minutes or until surface is dry and slightly cracked. If steaming in a boiling water steamer or steam oven, check for doneness after 15 to 20 minutes.

13. Cool. Slide knife around edge of cake to loosen it and unmold onto a plate.

14. Spread top of cake with a layer of Cool Whip or sweetened whipped cream.

15. Slice strawberries and place on top of cake.

16. Slice and serve.


Notices

Read about: low temperature baking.