Archive for the 'Recipes' Category


22
May
12

Maple Polenta Cake w/Chamomile Hominy (Steam Baked)

[ Equipment: steam oven, steamer or low-temperature-capable convection oven, an 6-inch (2-cup) round cake pan. For more information about the terminology in this recipe, see Low Temperature Baking: A Journey of 3 Paths. ]

The flour in this cake is a blend of cornmeal, coconut and mochi (sweet rice) flours. A polenta batter with only the cornmeal makes a rubbery cake. Starch from the rice flour softens the texture for a pleasant mouth feel. Coconut flour adds flavor, richness and restores a bit of the structure. Like all my cakes without a chemical or organic raising agent, I mixed in a solid leavener – chamomile infused hominy, a fine complement to the cornmeal. This is whole kernel hominy from a can, which has been soaked in an alkaline solution and partially cooked. Some brands have cooked the kernels longer than others. I recommend tasting the hominy before adding it to the batter. If the kernels are too crunchy, try steaming or boiling them for a few minutes, because the baking process may not soften them enough.

Makes 4 servings
– 250 calories per serving
– Oven Temperature: effective 250°F/121°C steam baked

  • 1 tablespoon chamomile flowers or 1 chamomile teabag
  • 1-1/4 cup boiling water
  • 1 cup canned hominy kernals (see text)
  • 1/2 cup cornmeal
  • 1 tablespoon mochi (glutinous rice) flour
  • 1-1/2 cup milk (low fat or fat free)
  • 3/8 cup maple syrup
  • 1/8 cup sugar
  • pinch of salt
  • 1/4 teaspoon cinnamon
  • 3 tablespoons coconut flour
  • 1/4 cup raisins

1. Brew chamomile tea by seeping chamomile flowers in hot water for 30 minutes. Filter tea. Reserve 1/4 cup of chamomile tea for later.

2. Rinse 1 cup hominy. Reheat remaining cup of chamomile tea. Soak hominy in chamomile tea for 1 to 2 hours. Drain, reserving hominy and 1/4 cup chamomile tea.

3. In a saucepan, stirring constantly, heat milk, 1/4 cup chamomile tea, syrup, water, sugar, cinnamon and salt to simmering.

4. In a small bowl, combine cornmeal and mochi flour. Whisk cornmeal into milk. Continue whisking over medium heat until thickened and batter begins pulling away from side of the pan, about 2 to 3 minutes. Remove from heat.

5. Mix in vanilla. Mix in hominy.


6. Mix in coconut and raisins.

7. Scoop dough into a greased, 2-cup baking dish.

8. If necessary, prepare the oven for steam baking. Steam bake for 50 mins.

9. Cool until warm for serving.


10. Slice and serve with a drizzle of maple syrup.

12
May
12

Chicken Stuffing Bread (Dehydrated)

The flavors and texture remind me of bread stuffing for chicken. To convert the recipe to 100% raw, omit the bouillon and crushed cereal. I only had tomato-chicken bouillon powder in my food bin. The cereal serves as a solid leavener, and is optional. It’s best made with fresh celery; week-old celery is almost no better than cardboard. Any commercial oat flour should be fine, but it’s just as easy to grind oatmeal in a food processor. The coconut flour keeps the bread pliable; otherwise the texture turns a little hard and brittle after a long period in the dehydrator. I finely ground unsweetened shredded coconut in a food processor to make coconut flour. The 1-1/2 hour dehydration time is at a temperature of 150°F/65.6°C. A lower temperature of 125°F/51.7°C will preserve enzymes and vitamins better, but increase the time to between 2 and 2-1/2 hours.

Makes 6 servings
– 92 calories per serving
– 125-150°F/51.7-65.6°C

  • 1 cup oat flour, coarsely ground (see text)
  • 2 tablespoons coconut flour or finely ground dried coconut (see text)
  • 1/2 cup very finely chopped or pureed celery (about 2 stalks)
  • 2 teaspoons tomato-chicken or other bouillon or 1 tablespoon soy sauce or 3/4 teaspoon salt (see text)
  • 1/4 teaspoon powdered chili peppers
  • 3/4 cup puffed wheat or puffed rice squares cereal – optional
  • 2 egg whites


1. Put puffed wheat or rice squares into a small plastic bag and crush with fingers or pulse a few times in the small bowl of a food processor.

2. In a small bowl, whisk the oat flour and coconut flour until well combined.

3. In a food processor, blend the egg whites and chopped celery until mixture is thick and foamy, about 1 to 2 minutes.

4. Add bouillon powder and chili powder to celery foam to flour and pulse a few times until combined.

5. Pour celery mixture into the flour and stir until combined. Add the crushed puffed wheat or rice squares and stir until combined.

6. Scoop dough into a greased 8-inch square pan. With the back of a spoon, press dough into bottom of pan.

7. Perforate dough every 1/2 inch with a 1/8 inch skewer. Cover with plastic wrap and let sit for 30 minutes.

8. Dehydrate at 150°F/65.6°C for about 60 minutes. Slice into 6 rectanges. Lift and transfer upside down to baking sheet covered with a non-stick mat. Slices should be at least 1/4-inch apart.

9. Continue dehydrating for another 30 minutes at 150°F/65.6°C.

10. Serve or store in an airtight container. The last picture below is the bread without a solid leavener (cereal). It’s a bit more than half as thick as the leavened bread.


03
May
12

Rooibos Hazelnut Spread Cookies (Dehydrated)

A semi-raw cookie with 5-ingredients with a nice balance of flavors. The powdered Rooibos tea comes from a Rooibos teabag. Bosc pears tend to be drier than other pears. Pureeing the Bosc pear adds just enough moisture to bind the dough, but is mild in taste and doesn’t overpower the tea. I tried doubling the amount of Rooibos to 2 teaspoons (the entire teabag), but felt the acidic balance tipped against the chocolate. If increasing the amount of tea for stronger Rooibos flavor, I would add a bit of sugar in the pear mixture to blunt the sharpness.

The store-bought chocolate-hazelnut spread (Nutella or equivalent) isn’t raw, but I’ve seen recipes for a raw version that could probably work as a substitute. I shaped the cookies by pressing the dough level into a tablespoon measure and gently prying them loose with same skewer for perforating the cookies (the perforations speed drying time). At the given dehydration temperature and drying times, the cookies bake up soft on the inside.

Makes 16 cookies
– 50 calories per cookie
– Oven Temperature: 125ºF/51.7ºC

  • 1 cup oat flour (coarsely ground – see text)
  • 1 teaspoon powdered Rooibos tea
  • 1/4 cup hazelnut chocolate spread
  • 1 medium bosc pear (3.5 oz)
  • pinch salt

1. In a small bowl of a food processor, finely chop 1 Bosc pear.


2. Add the Rooibos tea, hazelnut spread and salt. Process until smooth.


3. Add wet ingredients to oat flour. Mix to form a dough. Let dough rest for 5 minutes to solidify to consistency of wet clay. If dough is too soft to hold its shape, mix in 1 or 2 tablespoons of oat flour and let rest another 5 minutes.

4. Form cookies from 1 level tablespoon of dough and place on lined dehydrator tray or a nonstick baking sheet for oven dehydration. Perforate each cookie with a 1/8-inch skewer 4 times.

5. Dehydrate at 125ºF/51.7ºC for 2 hours. Top surface of cookies should feel dry and crisp.

6. Turn cookies over. Dehydrate for another 2 hours.


7. Cool and serve.

22
Apr
12

Daikon-Chana Mochi Rice Cake (Steam Baked)

Daikon radish cakes are staples in Chinese restaurants, from pan-steamed batters of rice flour and daikon radish puree. This version substitutes glutinous rice flour (mochi flour) for white rice flour. Because mochi flour cooks up sticky and gooey, a regular daikon mochi cake does not slice well. Slices of my first daikon cakes, even when refrigerated, melted on the plate. This cake gets its firm structure from two egg whites mixed into the batter.

Chana are chickpeas. I puree them into the batter and add whole chickpeas as a sort of solid leavener. I get my prepared chickpeas from a can: whole, solid, soft without any grittiness. Home-cooked chickpeas should be similarly soft, but without dissolving into mush. They add variations in texture. Pinto-bean daikon cakes work well (daikon-uzura cake), and they’re a big hit too.

Traditional daikon rice cakes are steamed; this one is steam baked and has a light crust. If desired, it could be made in a standard water steamer.

Makes 4 servings
– 250 calories per serving
– Oven Temperature: effective 250°F/121°C steam baked

  • 2 tablespoons dried shrimp
  • 3/4 cup boiling water
  • 6 oz daikon radish, sliced into chunks
  • 1 cup cooked chickpeas (drained)
  • 2 egg whites
  • 1/4 cup shrimp soaking liquid
  • 1/2 teaspoon salt
  • 1/8 teaspoon chili powder
  • 3/4 cup glutinous rice flour
  • 1/2 green beans, steamed, rough chopped

1. soak shrimp in hot water for about an hour. Drain, reserving 1/2 cup of liquid. Chop shrimp.

2. Cut daikon into small chunks. Steam for about 10 minutes.

3. In a small bowl of a food processor, puree 1/2 cup chickpeas and the steamed daikon.

4. Add egg whites, 1/4 cup shrimp soaking liquid, salt and pepper or chili powder and blend until smooth, about 1 minute on high speed.

5. In a large bowl, mix the rice flour and daikon puree. Stir to form a thick batter.

6. Add chopped green beans and chopped shrimp and stir until combined.

7. Mix in 1/2 cup chickpeas.

8. Pour batter into a greased, 6-inch (2-cup) baking dish. If necessary, prepare oven for steam baking. Bake at effective 250°F/121°C for about 40 minutes. Cake should be translucent and firm. The top of the cake should have a light crust.

9. Cool and serve.


05
Apr
12

Recipe Redux: Tomato-Basil Focaccia (Steamed)

[ Equipment: Steamer. For more information about the terminology in this recipe, see Low Temperature Baking: A Journey of 3 Paths ].

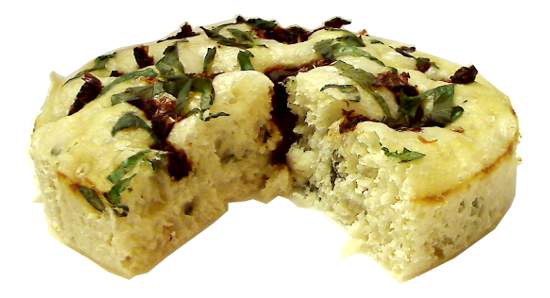
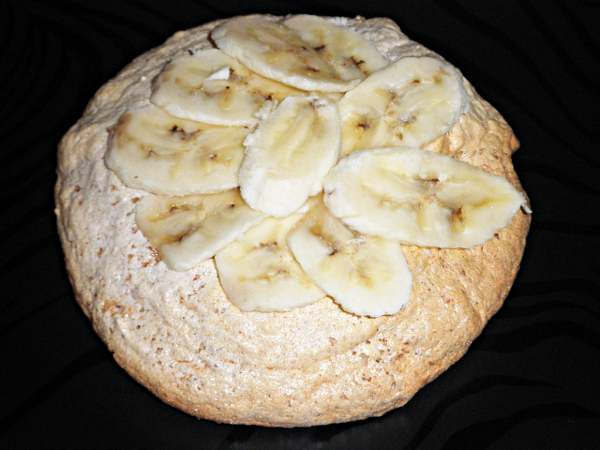
This steamed focaccia features a slow-rise, no-knead wet dough and is delicious and flavorful by itself, in a sandwich or toasted. Baking with dry heat tends to mute flavors, but from the first bite, the key characteristic of this bread is fresh flavors. Basil, sun-dried tomatoes and olive oil together all scream “pizza” but with an unusual intensity in the ingredients. Choose the basil carefully, because any bitterness in the leaves will be preserved in the finished loaf. Unusual in a steamed bread, the “browned” top crust visually suggests a baked bread, and there is even a hint of crust texture and flavor. More discussion on the browning technique below.

This recipe is a redux of my original slow-baked tomato-basil focaccia. It could be steam-baked too, for maybe a little more flavor in the crust, because of the lower humidity.

As is true of most steamed breads, the steamed focaccia is moist, but it also has a soft, light texture and it stays soft and moist for several days due to the incorporation of olive oil. By itself, the olive oil dough has become one of my favorite doughs for steaming. I make it when I need a basic bread, and am too busy to knead dough for a baked loaf. Compared to a freshly-baked water-roux sandwich bread, it doesn’t taste as creamy and may be a bit firmer in springyness, but it also keeps longer.

I’ve tried doughs with a higher olive oil content and recommend caution. The oil inhibits the rise, so more oil requires more yeast to leaven the dough. For example, increasing the olive oil to 2-1/2 teaspoons reduces rise height over 30% with the “pinch” of yeast specified. Even with double the yeast (say 1/8 teaspoon), the rise may not completely recover – though oil does enrich the bread and the softer, more cake-like, denser loaf may still be very tasty. The taste of the olive oil itself begins to stand out, so I recommend a good quality oil.

Although the dough is heavily hydrated (it’s almost a batter, but not quite), over- and under-hydrating will alter the texture. An under-hydrated dough (too little water) will stream up dry. An over-hydrated dough will need more time in the steamer and may produce a cakey texture and/or a coarser crumb, although my experience has been that steamed breads hold onto so much moisture that a coarse crumb isn’t as objectionable as in baked loaves. Rather, as the bread ages, the coarser texture stands out, more so after a light toasting. Even then, some may prefer the coarser texture in toasted bread.

The golden tone in the top crust is my idea for “browning” a steamed bread and is more than a cosmetic touch: it imparts a subtle flavor and texture as well. I brushed the top of the loaf with alkalized olive water before steaming. While it’s not the dark, thick, crispy crust of a regular focaccia, it does complete the presentation to the eyes and the mouth – and without adding the off-flavors of other browning agents.

I got the idea while making Chinese steamed buns, after observing that mixing baking soda into the dough after the first rise to neutralize acid caused brown streaks in the buns. Any unreacted soda alkalized the dough and facilitated Maillard browning, the same process for coloring pretzels dark brown by dipping them in a baking soda solution. Maillard reactions (specifically the binding of sugars to the amino acid asparagine) are responsible for the formation of acrylamides in baked foods, but in this recipe, the bread is steamed, and steamed foods have not been a significant source of acrylamides. In any case, the olive water can be omitted if no browning is desired.

Makes 6 servings
– 110 calories per serving
– Oven Temperatures: steamed

Dough:

  • 1-1/4 cup all-purpose flour (6.1 oz)
  • 1 teaspoon sugar
  • 1/2 teaspoon salt
  • pinch of active dry yeast or dry rapid-rise yeast (approx. 1/16 teaspoon)
  • 1/2 to 1 cup warm water
  • 1-1/2 teaspoon extra virgin olive oil
  • 2 teaspoons fresh basil, roughly chopped

mix dry. add 1/2 c water. add water 1 tablespoon at a time to form spreadable dough with a wet sheen – 1 T water for my 6.1 oz flour. mix in basil. rise

mash 6 green olives in a cup. cover with 1/4 cup hot water. infuse at least 30 minutes. Strain, reserving liquid.

steam 35-40 minutes. int. temp over 200F

Topping:

  • 4 sun-dried tomato halves, rehydrated in 1/2 cup hot water, sliced into thin strips
  • 2 teaspoons fresh basil, sliced into thin strips
  • extra virgin olive oil for brushing dough
  • coarse salt

1. Mix the flour, yeast, salt and water as described in steps 1 to 5 of the Chinese Steamed Buns recipe and let rise for 12 to 24 hours. Add the basil leaves and 1/2 cup of the warm water to the flour mixture first, mix and then add more water, a tablespoon at a time to form the dough. Hydration level is important. Too much will produce bread with a coarse texture. Too little and the bread will fail to rise.

Hydration depends on the moisture in the flour, which can vary brand to brand and batch to batch, and in the fresh basil leaves.

The focaccia dough differs from the steamed bun dough only in the amount of flour and the higher salt-to-flour ratio. The steamed bun dough has less salt because the filling dominates the seasoning of the buns.

2. Add olive oil and basil and vigorously mix the dough to deflate it and evenly distribute the oil and basil. Let the dough rest for 15-30 minutes to relax the gluten.

3. Cover the bottom of a 7-inch springform pan with a sheet of wax paper or parchment paper. Seat the pan collar around the bottom section and latch it. The wax paper should be securely held in place. Cut off any excess paper sticking out of the pan, leaving a small border of about 1/2 inch.

4. Grease the inside of the springform pan.

5. Pour the dough into the springform pan and spread it evenly to completely cover the bottom of the pan. Cover and let rise in a warm place until at least double in size – about 2 to 4 hours.

6. Preheat the oven or cooker to 250°F/121°C.

7. Gently brush on a thin layer of olive oil over the dough and sprinkle with coarse salt.

8. Press small clumps of tomato strips deep into the dough, distributing the clumps evenly over the dough. There should be about 10 or so tomato depressions. Too many depressions could deflate the dough.

9. Sprinkle the top with the sliced basil. Lightly press down on the basil so that it sticks to the surface.

10. Bake at 250°F/121°C for about 2 hours. If baking in an oven, place a small ovenproof cup of boiling water on the oven floor to moisten the air inside. If baking in a cooker, place two layers of paper towels under the lid to absorb excess moisture. Do not open the oven or cooker while baking. The moisture will help keep the crust from drying out before interior of the loaf has finished cooking.

11. Insert an instant-read thermometer into the center of the focaccia. If it reads 180°F/82°C or higher, continue to the next step.

12. Remove paper towels (cooker) or cup of water (oven). If baking in a cooker, leave lid slightly ajar to vent moisture. Reduce temperature to 225°F/107°C and bake for another 45 minutes or until the crust is dry and the focaccia has begun to pull away from the sides of the pan. When the focaccia is toasted in step 15, the drying will help produce a crunchier crust, especially at the edges.

14. Cool in cooker/oven with lid/door open a crack to vent moisture. Unmold. Put focaccia inside a plastic food bag and seal until ready to serve.

15. To serve, mark the focaccia into 6 wedges and cut out one wedge. Slice the wedge in half horizontally (this focaccia turned out 1-1/4 inch thick). Place each half in toaster and toast on the lightest setting or a setting to obtain the desired amount of browning. I set my toaster to the lowest setting of “1” and measured just over 300°F/148°C before the cycle ended.

31
Mar
12

Soaked and Sprouted, Three-Grain Essene Bread (Dehydrated)

[ Equipment: food dehydrator or low-temperature-capable convection oven, an 8-inch square cake pan. For more information about the terminology in this recipe, see Low Temperature Baking: A Journey of 3 Paths. ]

The Essenes were a religious community that lived in various locations in the Middle East. According to the Wikipedia, Essene bread is a low-temperature-baked bread made with sprouted wheat. I found several recipes for it on the web, baked at temperatures ranging from 115F to 300F. Like flour soaking, sprouting the grain helps release nutrients and neutralizes phytic acid. My version of Essene bread contains sprouted and soaked grains as well as an optional solid leavener – puffed wheat. Without the puffed wheat, the bread is 100% raw.

The 3 grains are wheat, oats and lentils. Typically, Essene bread is made with sprouted wheat. I had whole wheat flour in the food bin. This is my first raw recipe made with raw wheat flour, soaked for several hours in an acid medium. Soaking frees up nutrients, takes away the raw taste and softens the grainy flavor of whole wheat. Lemon juice can substitute for the vinegar. If the flour soaks at room temperature (typically how it’s done), it darkens a little. The color stabilizes if the batter chills in the refrigerator.

Lentils are beans but I’ve seen them in Essene bread recipes. The trick with sprouted lentils: don’t let them sprout too long or they turn too bitter for a raw bread – at least for my palate. They’re best (munchable and sweet) when the root tails measure between 1/8 and 1/4 inch. Oat flour: buy raw or make by grinding oats in a food processor. I like a coarsely ground oat flour for dehydration baking.

The picture above is a close-up of the holes in the bread from skewer pressings and the expansion of the puffed wheat. As the bread dehydrates, small spaces develop around the grains of puffed wheat to aerate the dough. The puffed wheat expands when moistened and then shrinks when dried, leaving gaps. Re-dried puffed wheat tastes crunchier and adds a toasted flavor to the bread.

Makes 6 servings
– 120 calories per serving
– Oven Temperature: 125°F/51.7°C

  • 3/4 cup coarsely ground oat flour
  • 1/2 cup lentil sprouts (1/4 cup dried lentils) or other sprouts
  • 1/2 cup whole wheat flour
  • 1/2 cup water
  • 4 teaspoons vinegar
  • 1/2 teaspoon salt
  • 1/8 teaspoon powdered garlic
  • 1/4 teaspoon pepper or chili powder
  • 3/4 cup puffed wheat

1. In a medium bowl, soak 1/4 cup lentils for 8 hours. Drain, rinse, cover with plastic wrap and let sit for 16 hours. Lentils should have sprouted with roots about 1/8 to 1/4 inch long. Set aside.

2. In a small bowl, mix the whole wheat flour, water and vinegar. Let sit for at least 8 to 24 hours in the refrigerator. Taste the soaking liquid. Soak is ready when the liquid no longer tastes tart or acid.

3. In a small food processor, pulse chop the puffed wheat until grains are about 1/3 size. Alternatively, put the puffed wheat in a small plastic bag and crush them to about 1/3 size. Set aside.

4. In a small bowl, whisk the flour, salt, garlic and chili powder until well combined.

5. In the small bowl of a food processor, puree soaked flour (with soaking liquid) and 3/4 cup of lentil sprouts for 1 to 2 minutes until smooth.

6. Add the sprout-soaked flour mixture to the oat flour and mix until moistened.

7. Add the crushed puffed wheat and mix until evenly distributed.

8. Grease an 8-inch square pan. Drop dough into pan in chunks. With the back of a spoon, press dough into bottom of the pan.

9. With a 1/8-inch skewer, perforate the dough to the bottom, the holes spaced about 1/2 inch apart. Cover with plastic wrap and let sit for 30 minutes. Dehydrate at 150°F/65.6°C for about 30 minutes. Reduce to 125°F/51.7°C and dehydrate for another 30 minutes.


10. Cut bread into 6 slices. Lift each slice with a spatula. Turn over and transfer to a baking sheet covered with a silicone mat. Perforate each slice with a skewer and continue dehydrating for another 30 minutes at 125F/51.7C.


11. The bread is sturdy enough to hold the sandwich by hand, but it’s even neater when wrapped in wax paper.

18
Mar
12

Apricot Chamomile Scones (Dehydrated, Low Sugar/Fat)

[ Equipment: food dehyrator or low-temperature-capable convection oven, an 8-inch round cake pan. For more information about the terminology in this recipe, see Low Temperature Baking: A Journey of 3 Paths. ]

After my dehydrated lavender brownies, I wanted to try a dehydrated pastry with a denser, more crumbly texture. Once again, I thought about using the dough from one of the dehydrated cookie recipes, but even a spoonful of that dough without the solid leavener contains enough calories to wreck a healthy eating habit. A regular blueberry scone from Starbucks coffee house weighs in at 120 grams and 460 calories. An equivalent weight apricot chamomile scone from this recipe contains 384 calories. Neither scone would qualify exactly as diet food, but the apricot scones have a lovely soft texture, with lots of raw grain (if made with raw oat flour) and fruits, with a surprising sweetness that really satisfies.

Apricots and chamomile complement each other’s flavors, both mild and sweet. The recipe calls for 2 teaspoons of chamomile flowers. These are the whole flowers for a strong cup of tea. I made the coconut flour by coarsely grinding dried, unsweetened coconut flakes in a food processor. The coarse grind gives a crumbly texture to the dough, reminiscent of a baked scone. The sugar is a blend of regular brown sugar and sucralose. An equivalent amount of regular white sugar or powdered sucralose (packets) should work just as well as the specified granulated version. The rice squares function as a solid leavener and help aerate the dough and build volume. They’re totally optional, because the scones are delicious without them.

Makes 8 scones (approx. 80 gr. each)
– 240 calories per scone
– Oven Temperature: 125°F/51.7°C

  • 8 dried apricots
  • 2 heaping teaspoons chamomile flowers or 2 chamomille teabags
  • 1 cup boiling water
  • 2 cups oat flour (coarsely ground – see text)
  • 1 cup coconut flour (coarsely ground – see text)
  • 3/4 cup granulated sucralose or sugar
  • 1/4 cup dark brown sugar
  • 1 egg white
  • 1 teaspoon vanilla extract
  • 1/2 teaspoon powdered cinnamon
  • 1/4 teaspoon salt
  • 1 cup rice squares cereal (optional)
  • 1/2 cup raisins

1. In a small bowl, infuse chamomile in the boiling water for 2 to 3 minutes. Add apricots and soak for about an hour.

2. Remove apricots. Drain liquid, discarding chamomile flowers. Set aside apricots and liquid.

3. In a large bowl, mix the oat flour and coconut flour until well combined.

4. In a small food processor bowl or hand blender cup, puree the apricots, egg white and chamomile tea.

5. Add sucralose and brown sugar and blend.

6. Add vanilla extract, cinnamon and salt and blend until smooth.

7. Pour liquid mixture into flour mixture and mix until thoroughly moistened.

8. Add raisins and mix.

9. Add rice squares cereal and gently mix until well combined. Try not to crush the cereal.

10. Pat the dough into an 8-inch cake pan. Perforate the dough by pressing a 1/8-inch skewer all the way down into the dough at 1/2-inch intervals.

11. Cover with plastic wrap and let sit for about 30 minutes.

12.  Bake at 150°F/65.5°C for 30 minutes. Then reduce temperature to 125°F/51.7°C and continue baking for 3 hours.

13. Invert scones onto a cookie sheet with a baking mat. Perforate the dough again at 1/2-inch intervals.

14. Bake at 125°F/51.7°C for another 3 hours.

15. Slice scones into 8 wedges and serve.

01
Mar
12

Triple Floral Red Earth Cake (Baked, Low Fat/Sugar)


[ Equipment: convection oven (preferred) or other LTB oven, a 8-1/2 x 4-1/2 x 2-1/2 (inch) loaf pan. For more information about the terminology in this recipe, see Low Temperature Baking: A Journey of 3 Paths ].

Compared to the mini red earth cake I made back in 2010 as a tribute to the American South of Gone With The Wind, the “triple” in the title of this cake refers to its size (3 times the size of the mini) as well as the 3 kinds of flowers that color and flavor it. In the original, a hibiscus infusion tinted the deep brown cake with a rusty tinge spotted with flecks of red hibiscus petals. The texture of that cake could sometimes taste dry, so I reformulated it recently with greater moisture retention in mind. A small amount of oat flour (coarsely-ground rolled oats) absorbs water more efficiently than wheat flour. The cornstarch has been replaced with more baking powder – which has a cornstarch base and helps soften the crumb. For this reason, the baking powder MUST have a cornstarch base (check the label – it should be the first ingredient). I’ve tried as much as 3 tablespoons of baking powder, because the hibiscus seems to reduce the lift, but 3 was too much. The cake has more fat (in the form of oil), but still earns the title of low fat at around 5 grams per serving.

A tri-part bouquet infusion subtly flavors the updated cake with hibiscus, roses and lavender. The color is lighter and redder, due to the slightly higher concentration of red and purple flowers and acidified natural cocoa powder. A traditional red earth (like a traditional red velvet cake) rouges from red food dye and the acidification of natural cocoa powder. My mini cake from 2010 contains dutch-processed cocoa (Hershey’s Special Dark Cocoa) that never reddens. In this cake, the tartness of the floral blend is the main acid in the batter, and I mix in some lemon juice to fix the color of the cake and restore brightness to the flavor.

Since I put in more oil, I take out calories by replacing the sugar with a sucralose-sugar blend. I grind the flower petals and buds with real granulated sugar, but sweeten the rest of the cake with granulated no-calorie sucralose. Although granulated sucralose weighs less than sugar, I did run a test with it as a grinding medium for the flowers, and it works fine. In general, I prefer the taste of sucralose-sugar blend, but this cake could be made with 100% granulated sucralose or 100% sugar, for that matter.

In one of the pictures, I garnish the cake with a “sugared” nut. The coating is actually granulated sucralose, which bakes into a whitish shell. The nuts are quite tasty, so I include the recipe for them below. By the way, I should emphasize that this cake was made with granulated sucralose throughout, not powdered sucralose – the kind in the packets. Powdered sucralose could work too, but with a slight change in the texture of the cake and in the appearance of the nuts.

Makes 8 servings
– 165 calories per serving
– Oven Temperature: 250°F/121°C

Cake:

  • 1-1/2 cup all-purpose flour
  • 1/4 cup oat flour (see text)
  • 1/4 teaspoon salt
  • 1-1/2 tablespoons double-acting baking powder
  • 1/4 cup boiling water
  • 2 teaspoons lemon juice
  • 1/2 teaspoon powdered coffee bean or instant coffee crystals (see text)
  • 1.2 oz. dried hibiscus flowers (approx. 4 tablespoons powdered hibiscus, see text)
  • 2 tablespoon dried rose petals
  • 1 teaspoon dried lavender flowers
  • 1 tablespoons natural cocoa powder (see text)
  • 1/4 cup sugar
  • 3 tablespoons vegetable oil
  • 1/2 cup applesauce
  • 2 large eggs
  • 1/2 teaspoon vanilla extract
  • 3/4 cup granulated sucralose
  • 1 tablespoon evaporated milk, skim or reduced-fat
  • Fat-free Cool Whip topping or whipped evaporated skim milk (sweetened)

Sugared Nuts:

  • Assorted large nuts (almonds, pecans, cashews, Brazil nuts)
  • 2 to 3 tablespoons granulated sucralose or sugar
  • 1 egg white


Sugared Nuts Method:

1. Cover cookie sheet with silicone baking mat or parchment paper. Rinse off nuts of any oil and salt and dry.

2. In a small dish, light beat the egg white. Dunk nuts in egg white and allow excess to drip off.

3. Roll nuts in sucralose or sugar until evenly coated.

4. Place nuts on baking sheet.

5. Bake at 250°F/121°C for about 25 minutes or until sugar coating is dry and has turned lightly golden.

Cake Method:

1. In a medium bowl, whisk all-purpose flour, oat flour, baking powder and salt until well combined. Set aside.

2. In a small food processor, add 1/4 cup sugar, hibiscus, rose petals and lavender buds. Process until contents have turned to powder.


3. In a medium bowl, mix boiling water and floral powder. Let infuse for at least 5 minutes and until water has cooled. Add coffee crystals/powder, cocoa powder and lemon juice. Stir and let sit for 2 to 3 minutes.

5. In a large bowl, whisk the eggs, vegetable oil, applesauce, vanilla extract and evaporated milk until well combined.

6. Mix in 3/4 cup granulated sucralose. Mix in hibiscus infusion.


8. Mix in flour mixture in 3 or 4 portions.


9. Pour into 8 x 4 inch loaf pan. Cover top of loaf pan with aluminum foil, crimping down edges. With a scissors or the pointed end of a bamboo skewer, cut out a rectangle in the foil, leaving a 1-inch border. With scissors, at each corner of the rectangle, snip a 1/2-inch diagonal cut.

10. Bake at 250°F/121°C for about 20 to 25 minutes or until cake almost touches foil. With 2 spoons or forks, peel back foil flaps on all 4 sides. Continue baking for another 15 to 20 minutes (total baking time: 35 to 45 minutes). Cake is done if a skewer inserted in the center comes out clean.

11. Let cool. Unmold.


12. Slice and serve. Below are two ideas for serving the cake: whipped cream topped with a sugared nut or whipped cream, a sprinkle of cocoa powder and topped with a sliced strawberry.


21
Feb
12

Mint Lavender Brownies (Dehydrated, Low Sugar/Fat)

[ Equipment: food dehyrator or low-temperature-capable convection oven, an 8-inch square cake pan. For more information about the terminology in this recipe, see Low Temperature Baking: A Journey of 3 Paths ].

These semi-raw, moist, chewy brownies scented of mint and lavender have been packed with grains, fresh and dried fruits and nuts, but weigh in at less than 1/2 the calories and 1/5 the fat of commercial raw brownies made from date and nut pastes. The solid leavener (puffed rice squares cereal) transforms the oat flour dough into a pseudo-cake with a soft, coarse crumb. It’s also the only non-raw ingredient and could be omitted to make 100% raw brownies.

It was my first dehydrated cake. In raw cuisine, a cake is constructed from layers of date and nut pastes, often chilled or frozen for firm slicing. I wanted a cake with a lighter texture, however. Plus, a cake on VaporBaker should be baked; chilled cakes didn’t truly qualify. The raw cookie doughs from my earlier dehydration recipes would be too firm or crumbly to fashion into cakes. They had binders of a nut or legume butter sweetened with honey or a syrup, binders that broke apart too easily for a chewy-type brownie.

For this recipe, I coarsely ground oatmeal in a food processor to make oat flour in a ratio of 1-1/4 cup oatmeal per 1 cup of oat flour. A maple syrup, raisin and banana puree formed a very flexible binder, because the hydrophilic fruits dehydrated slowly into a sticky adhesive. A large banana alone pureed with the syrup could probably have held the cake together as well, but the raisins helped darken the binder to blend well with the cocoa.

The brownies can be made without a leavener, but puffed rice squares substantiated the texture by adding volume without impacting the taste. Regular puffed rice cereal (individually puffed grains of rice) might not work as well as the squares, which trap more air in the dough. Do not substitute a puffed grain containing gluten (such as puffed wheat or puffed kamut). The gluten stretches too much when moist for a rubbery mouth feel.

I’ve been experimenting with low-fat, low sugar ingredients, but only recently extended that paradigm to dehydrated pastries. Alternative no-calorie sweeteners like sucralose didn’t behave like sugar other than as a sweetener. For example, the sugar-free maple syrup from Maple Grove Farms (the only brand in my local market) lacked the body and tack of regular syrup, so I left it to the banana-raisin puree to supply both flavor and adhesion for the dough. For those who avoid sucralose and all the other alternative sweeteners, I have also given sugar-based options.

The perforations in the dough helped speed the evaporation of moisture. The brownies are heated at a relatively high temperature of 150°F/65.5°C for the first hour to warm up the dough quickly and reduce the overall dehydration time (less than 3 hours total). Those with more time could dehydrate at 125°F/51.7°C throughout.

Although these brownies must refrigerated because they contain fresh fruit and will spoil at room temperature, they will harden when chilled. A few minutes in the dehydrator brings them back to life.

Makes 12 servings
– 100 calories/3g fat per serving
– Oven Temperature: 125-150°F/51.7-65.5°C

  • 2 cups coarsely-ground oat flour (see text)
  • 1/2 tablespoon lavender flowers
  • 1 teaspoon crushed mint leaves
  • 1/2 cup natural cocoa powder
  • 2/3 cup sucralose-sweetened maple syrup or dark agave syrup (see text)
  • 4 packets powdered sucralose or 1/8 cup sugar
  • 1 medium banana
  • 1/2 cup raisins
  • 1 teaspoon vanilla extract
  • 1/4 teaspoon salt
  • 1/2 teaspoon finely ground coffee bean or instant coffee
  • 1 cup puffed rice squares cereal (Rice Chex)
  • 1/4 cup raw sunflower seeds (optional)

232 cal/15 g fat

1. Cover raisins, lavender flowers and mint leaves in hot water and soak about 1 hour or until plump. Drain, reserving raisins, lavender flowers and mint. Set aside.

2. In a large bowl, mix oat flour (w/lavender), salt, cocoa powder until well combined.

3. In a blending cup, puree maple syrup, raisin mixture, vanilla extract, salt, coffee powder and sucralose with an immersion blender until smooth (or do this in a blender).

4. Add banana, cut into small chunks, and blend until smooth. Total volume should be around 1-1/2 cups.

5. Pour wet ingredients into flour mixture and stir until moistened.

6. Stir in sunflower seeds.


7. Add puffed rice squares cereal and stir gently until evenly distributed. Try to avoid crushing the cereal.

8. Grease 8-inch square pan. Press dough into the pan. With 1/8 inch skewer, perforate the dough through to the bottom of the pan at 1/2-inch intervals.

9. Dehydrate at 150°F/65.5°C for 1 hour. Reduce heat to 125°F/51.7°C and dehydrate for another 1-1/2 to 2 hours. Brownies should be firm, moist but not soggy. Score into 12 squares.

Store brownies in an air-tight container in the refrigerator. Warm them before serving.

17
Feb
12

Ginger Meringue Cake (Pavlova) w/Bananas, Ginger-Blueberry Sauce (Baked, Low Sugar-Fat)

[ Equipment: convection oven (preferred) or other LTB oven, baking sheet. For more information about the terminology in this recipe, see Low Temperature Baking: A Journey of 3 Paths ].

July 22, 2012: I now recommend that this cake be made with a wet-dry steam baking method to set the cake faster and 1 tablespoon of cornstarch in the batter for improved texture. Fill the water tray for 30 minutes of steam. See here for details. For a crispy crust, use 100% sugar. For a taller cake (and lower calories), use the sugar-sucralose blend.

Between the 2 kinds of meringue cakes, Pavlova and angel food, the Pavlova had the advantage of being easier to prepare, or so I thought. Over the months, I baked many, varying the amounts of cornstarch, lemon juice, flavorings, all-sugar vs. sucralose-sugar blends, preparation procedures. The crust on a typical Pavlova sinks and cracks as it cools. The version presented here has a thinner crust that cracks only a little and doesn’t sink much at all.

The picture above shows a maple Pavlova meringue with substantial cracking and sinking. The main differences between it and this recipe are the amount of cornstarch – only half as much in the Ginger cake and the reduced baking time – 30 minutes less for the ginger cake. Less cornstarch didn’t appreciably alter the taste of the meringue (it still had the starchy characteristic of a Pavlova), but it did help the meringue hold its shape longer in the cooler oven. More cornstarch seemed to create a slicker batter.

Another reason for the spreading appeared to be the fact that I mixed in granulated white sugar instead of the caster sugar specified in almost all recipes. Granulated sugar didn’t dissolve quickly, and the left-over grains may have caused the structure of whipped egg whites to collapse under heat. My solution was to add the sugar while the whites were still liquid, before they began drying out from the suspension of air bubbles from the whipping. The maple meringue also contained 100% sugar, which may have contributed to the fragile crispness that dammed batter as it formed.

Having said all that, the batter spread made larger disks of meringue, which could then serve more people. One time, it came out in a 10=inch round that was about 3/8-inch thick (see picture above). It easily could serve 8 by piling more fruit and whipped cream over it. The batter in this recipe resists spreading. The ginger cake started out as a 5-1/2 round and came out measuring 7 inches in diameter. For a larger cake, make a larger round with the meringue before baking.

The Pavlova is fat-free, gluten-free and low sugar. In place of the fat-free Cool Whip topping, I would beat evaporated skimmed milk until thick and then sweeten it with sucralose to taste. Those who don’t like no=calorie sweeteners could increase the amount of granulated white sugar to 1/2 cup.

Makes 4 servings (up to 8 servings – see text)
– 130 calories per serving (4 servings)
– Oven Temperature: 250°F/121°C

Meringue Cake:

  • 3 large egg whites (room temperature)
  • pinch of salt
  • 1 teaspoon lemon juice
  • 1/2 teaspoon vanilla extract
  • 1/4 cup sugar + 8 packets sucralose or 1/2 cup sugar (see text)
  • 1/2 tablespoon cornstarch
  • 2 teaspoons powdered ginger
  • 1/4 teaspoon chili powder

Ginger Blueberry Sauce and Cake Topping:

  • 1 cup blueberries
  • 1 packet sucralose (see text)
  • 1/8 teaspoon powdered ginger
  • 1/4 teaspoon cornstarch
  • 1 teaspoon water
  • 1/2 banana, sliced
  • 1 cup no-fat sweetened whipped cream or no-fat Cool Whip topping

Ginger Blueberry Sauce Method:

1. In a heatproof dish, lightly mash 1/2 cup of fresh blueberries.

2. Add powdered ginger, sucralose and mix.

3. In a small dish, mix the cornstarch and water. Add to the blueberries and stir.

4. Microwave on HIGH for about 1-1/2 minutes until thickened.

5. Cool for a few minutes. Mix in 1/2 cup of fresh blueberries. Set aside.

Pavlova Method:

1. In a large bowl, beat the egg whites, lemon juice and salt until foamy.


2. Beat in sugar or sugar-sucralose blend in 3 or 4 portions and beat to the soft peak stage. Then add vanilla extract and beat to the stiff peak stage. Egg whites should still be glossy but not wet.

Note: granulated white sugar will not dissolve completely in stiffly beaten egg whites. Add the sugar at the foamy stage only or substitute a finely ground sugar.


3. In a small bowl, mix the cornstarch, ginger, chili powder until well combined. Fold mixture into the egg whites.


4. Set a silicone baking mat on a baking sheet or cover a baking sheet with parchment paper. Gently spoon the egg white batter onto the baking sheet and shape into 5-1/2 inch round. The top should be slightly concave.

The pavlova will spread a little as it bakes. In my oven, a 5-1/2 inch disk of meringue evens out to about 7-inches.

5. Bake at 250°F/121°C for 30 minutes. If the base of the meringue cake is a golden brown and will burn, reduce heat to 200°F/93°C and continue baking for another 30 – 45 minutes, until the surface of the cake is dry and the sides are lightly golden. Turn off the oven and allow the cake to cool completely in the oven.

If the cooled cake feels soggy on the surface, dry it out in a 200°F/93°C for 10 to 15 minutes.

6. Transfer the pavlova to a serving plate.

7. Cover the top of the cake with a layer of sliced bananas.

8. Spread on a layer of no-fat whipped cream or whipped topping.

9. Pour the ginger-blueberry sauce and blueberries over the whipped cream. Slice and serve.


Notices

Read about: low temperature baking.